We are mastering one of the simplest and most demanded operations - we learn to resize an image in Adobe Photoshop.

Instructions
Step 1
First of all, we launch the Adobe Photoshop program and open the file we need. This is done through the File> Open menu. We select this menu item, find the file we need on the disk, click on it with the mouse and press the OK button. The file has loaded.
Now you need to think about what the new size of our image should be. It depends on his further fate. Typically, an image can be targeted:
- for printing on paper (in magazines, newspapers, etc.)
- for publication on photo sites on the Internet
- for technical needs - creating avatars, userpics, pinning them as auxiliary material and illustrations to articles, etc.
Depending on the purpose, the final size of the picture can be calculated in different ways.
Step 2
Most often, you need to prepare a file in order to send it to someone by e-mail or upload it to some website. That is, in the future it will be necessary to simply look at the image on the monitor screen - it should be no more than the resolution of an average screen. Thus, the defining numbers for us will be the screen size (approximately 1250 x 1000 pixels).
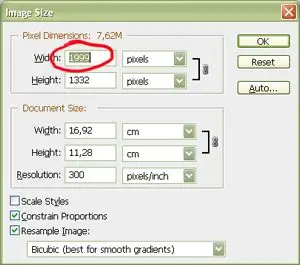
Find the Image Size item in the Photoshop Image menu or press the Alt + Ctrl + I key combination on the keyboard (that is, while holding down alt="Image" and Control, press the Latin I). A window with image size parameters opens in front of us.
In the English version of Photoshop, it looks like this:

Step 3
In the first two fields, we see numbers that determine the size of the picture. In this case, our original image is 1999 by 1332 pixels. Let's say we need to prepare it in order to place it on our LJ page. The livejournal tape, as a rule, occupies 80% of the full width of the monitor screen, that is, it makes no sense for us to hang a picture there that exceeds this width.
Enter 1000 pixels in the top Width field. In this case, the value of the height (Height) of the picture was automatically recalculated and is now displayed as the number 666. (Nothing mystical;)) If this did not happen, then, just in case, check the options settings at the bottom of the window - there should be a checkmark opposite the Constrain Proportions items (Save aspect ratio) and Resample Image. The proportions are not violated, the image can be recalculated.
Press the OK button and see how the image has become slightly smaller.
We can save it to disk with a new size and name. Find the Save As item in the File menu and select where and with what name our picture will be saved.
Remember! After reducing the file, information about the image is lost and distorted (even if "by eye" it is imperceptible). Then restore it back - again you will not be able to enlarge the image in full quality by any technical means. Therefore, it is strongly recommended to leave the original file untouched, and save all converted and reduced images with a different name or in a different place, so that you can always re-refer to the original source. You never know why you may need this photo in a year, and, of course, you will be very offended if instead you find only a reduced distorted copy.
Step 4
Let's do a little differently with the recalculation of the image parameters, if our goal is to prepare it for printing. Here you need to proceed from the size of the printed illustration. Let's say we know that it should be 5 cm high. But how to determine how many pixels are in these five centimeters?
Printers have their own standards and measurement systems. Traditionally, they define aspect ratios in terms of an inch. At the request of modern printing, an image of acceptable quality must be prepared at the rate of 300 dpi (300 dpi, 300 pixel / inch). That is, an inch-by-inch square image should be 300 pixels by 300 pixels. But we do not have to manually recalculate how many inches in our illustration and how many pixels it will take, we will put this operation on the shoulders of automation.
Go to the Image Size item of the Image menu (or, as we already know, press the Alt + Ctrl + I key combination on the keyboard). We see a window with image size parameters.
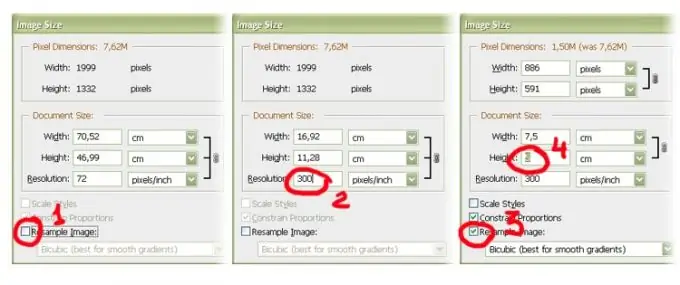
We translate our image into a polygraphic measurement system. Temporarily uncheck the Resample Image item. The image will remain intact. Now in the Resolution field, set the parameter we need to 300 pixel / inch. After that, we are sure that the parameters of the height and width of the document show us the real printed size of the picture - in our case, if the file is not reduced, it can be printed with dimensions of about 17 by 11 cm. But this is unnecessary for us, the photo can be reduced without a claim from sides of printers. To do this, uncheck the Resample Image item and enter the size of the illustration we need in the appropriate field. We see that the width of the picture has changed proportionally, the document now has a size of 7.5 by 5 centimeters, and the size of the picture in pixels has also become known - 886 by 591 pixels. OK.
Remember! Different printing houses may have their own requirements for the preparation of images, so consult about the resolution with which you need to prepare the files. It will be very disappointing if, due to technical ignorance, your illustrations come out on the press as muddy, indistinct and distorted.

Step 5
There is also another need. Sometimes the final size of the picture is known exactly, for example, to create an avatar - 100 by 100 pixels, and our original image is not only much larger, but also has completely different proportions. How to proceed here?
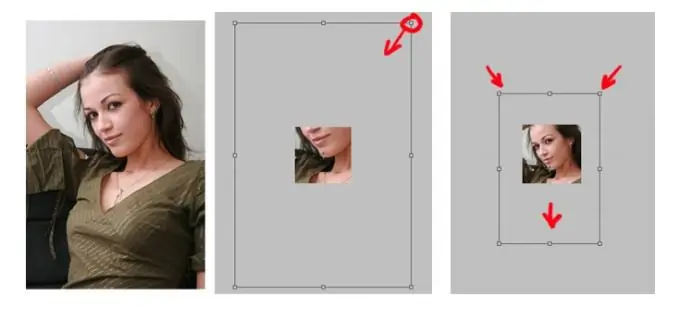
Open the image and carry out the following operation: find the menu item Layer> New> Layer from Background (Create a layer from the background). Then we set the final size of the image by going to the Image> Canvas Size menu - there we see two fields with numbers, into which we enter the values we need for the width and height of the future image (for example, 100 by 100 pixels)
Here's what we got: through a small window, only a small section of the original image is visible, the edges of which go beyond the field of view and “do not fit” into the final format.

Step 6
Press the key combination Ctrl + T (or find the item Free Transform in the Edit menu) and, moving the square pointers along the corners of the layer, select the necessary fragment that will be visible in the final image (when dragging the control elements, it is recommended to hold down the Shift key - this will allow keep the proportions of the original picture). We confirm the changes with the Enter key.
Having finished the transformation, remove the unnecessary information about the cropped edges of the image from the file - select the Flatten Image item in the Layer menu.
Save the resulting image via the File> Save As menu


