Sometimes we want to check how this or that program will work on a smartphone or tablet, which we do not have at hand. To do this, we can use the BlueStacks Android device emulator program for computers running Windows or MacOS.

Necessary
- - PC / laptop with Windows or MacOS;
- - BlueStacks program.
Instructions
Step 1
BlueStacks allows you to run Android apps on a Windows or MacOS computer.
- Download it to your computer from the site https://www.bluestacks.com/ for the corresponding system.
- After installing and running the program, click on the Settings button.
Step 2
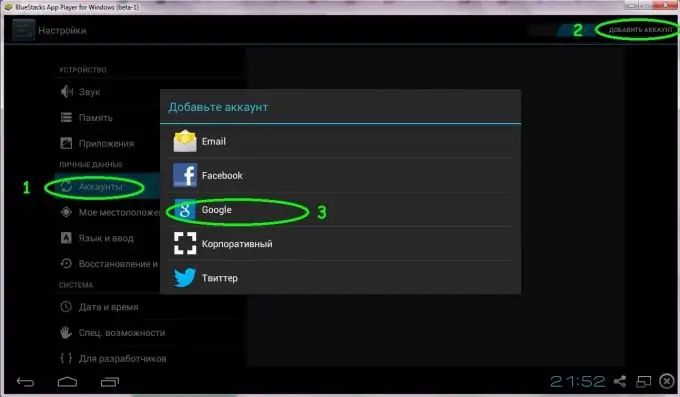
In the settings on the left from the list, select Accounts.
- In the upper right corner, click the Add Account button
- In the window that appears, select Google mail in order to connect in the future to the Google Play store.

Step 3
In the next window that appears, click on the Existing button if you have Google mail.
If not, New.
Then follow the prompts of the program.
Step 4
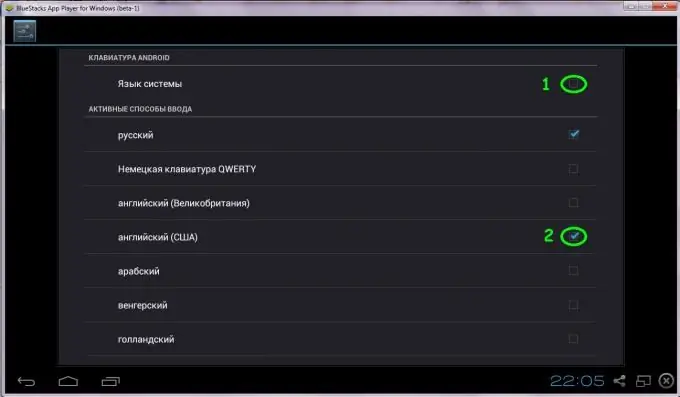
To set up input languages for the keyboard, you must:
- press the Settings button
- select Input languages
- uncheck the System language line
- add new keyboards if necessary.
- to return to the previous menu, press the arrow in the lower left corner.

Step 5
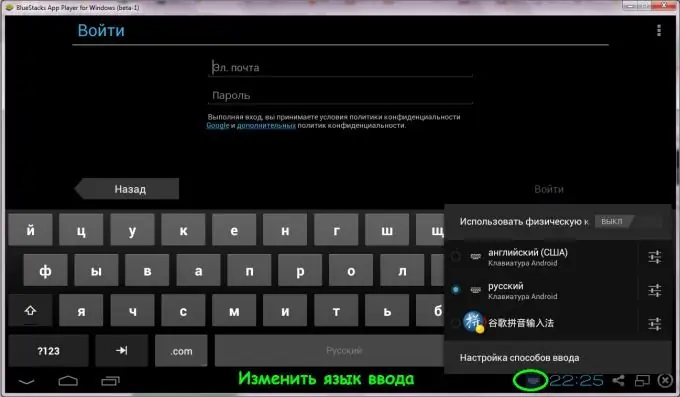
To change the input language, tap on the keyboard next to the clock.

Step 6
Full screen mode.
- for Windows users, in order to expand BlueStacks to full screen or exit it, press the F11 key
- click on the icon of two rectangles at the bottom of the screen.
Step 7
After connecting to your account, skip setting up your credit card information by clicking the Not Now button.
- If you need a backup of a virtual phone or tablet, then leave a checkmark in front of the corresponding entry.
- Click the Next button.
Our account is set up.
Step 8
- Exit the settings menu by clicking on the arrow at the bottom left of the screen.
- Click on the Search button.
- If the "One time setup" window appears, click the Continue button.
- A window will appear to synchronize the virtual phone / tablet with the computer. Click Proceed.
- Next, a window for logging into a Google account will open. We enter a password for it.
- After entering, we see in the top line Add phone (Add phone). Click on it.
- Click on the Let's go button!
Step 9
We get to the Google Play login window.
We accept the terms of its use. If we do not want to receive the newsletter, then uncheck the box first.
Step 10
Installing the application.
For an example of checking the operation of the mobile Internet "MTS Tablet", we will install the MTS TV application.
To do this, we need a SIM card from MTS with the "MTS tablet" option connected and a usb modem for SIM cards.
- Click on the Search button in the upper left corner.
- In the query line, we type MTS TV.
- Press the button Search Play for MTS TV.
- We click on the found program.
- Click Install and Accept.
The MTS TV application is now installed on the virtual device.
Step 11
Application launch.
- Immediately after installing the application, an Open button will appear in the upper right corner.
- We press it.
- We accept the terms of use.
- We connect the modem with the MTS tablet SIM card to the computer and check the operation of the application.


