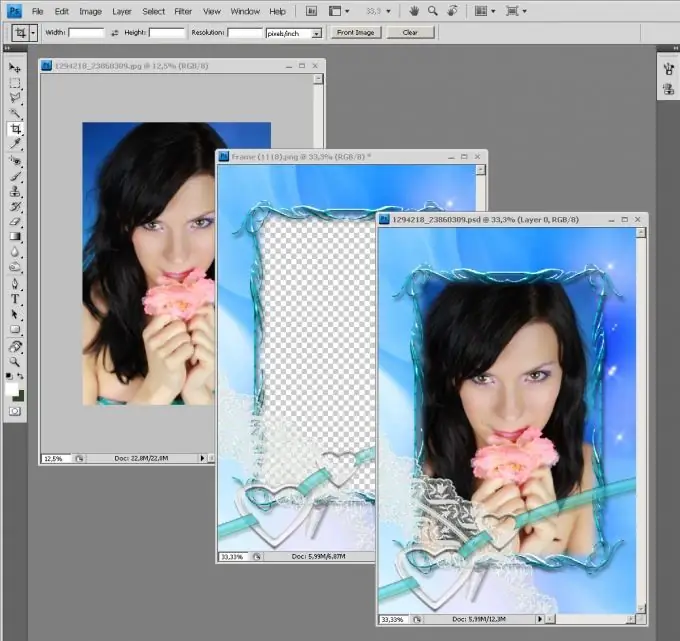
On the Internet, you can find a huge number of free photo templates for every taste. You can choose a frame template, a template with a calendar or greeting lettering, a template in the form of a human figure, and so on. There are also templates for several photos - couples, family or group. You can save a photo designed in this way for use on the Internet, or print it.

Instructions
Step 1
Find the photo that you would like to design with the template. Download a template that matches your photography (usually in.
Step 2
Compare the size of the template and the photo. If they differ, make them the same in height or width using the menu item "Image - Image Size". Remember that it is better to shrink the larger image rather than enlarge the smaller one in order to maintain the best quality materials.
Step 3
Open the template and photo in Adobe Photoshop graphics editor. You will need the "Layers" palette. It will open if you press the F7 key. Place in the workspace two windows side by side - with a photo and with a frame. Make a window with a frame active by clicking on it with the mouse.
Step 4
Make sure that one layer should be visible in the layers palette - on which the frame is located. Now you can drag this layer with the mouse into the photo file window so that the frame is on top. Hold down the Shift key while moving the layer - then the frame will lie exactly relative to the edges of the file.
Step 5
See if you are happy with the result. Maybe you want to make the photo smaller? To do this, before you scale the photo, you need to turn the Background layer into a regular one. To do this, double-click on the name of the layer. A dialog box will appear in which you can enter a new name for the layer - "Layer 0" by default. The rest of the parameters are the color that will be used to designate the layer in the palette, the layer blending mode and transparency do not need to be changed.
Step 6
Resize the photo below the frame, if necessary. Select the "Move Tool" from the toolbar. This tool's icon is a small black arrow with a cross next to it. It is the first from the top in the toolbar. It can also be called by pressing the "V" key. Please note: in the tool settings panel, which is located at the top of the program workspace, the “Show transform controls” checkbox must be checked.
Step 7
Click on one of the squares that appear in front of you. The dotted line should turn into a solid line. Find the chain icon in the tool settings panel (at the top of the program space) and click on it. This is necessary in order for the image to resize proportionally.
Step 8
Decrease or increase the layer with the mouse while holding down the Shift + Alt keys. Once the photo is the size you want, click the checkmark icon, which is located closer to the upper right corner of the workspace. The crossed out circle icon next to it resets all changes made to the layer size.
Step 9
If the result suits you, save the photo under a new name using the "File - Save As" menu item in.jpg"


