High-quality and colorful photos, as a rule, have a large volume, which is unacceptable in the case of posting photos on the network. Nevertheless, everyone wants to post frames on a social network or on a photo hosting site that have not lost their quality after reducing the size. Learn to optimize photos for online publishing so that their quality does not suffer after changes - for this you need Photoshop.

Instructions
Step 1
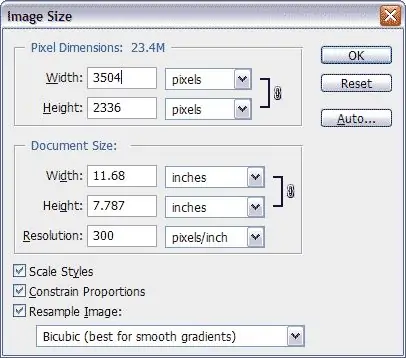
Load the photo in Photoshop, and then adjust its color rendition, saturation and contrast, if necessary. After retouching the frame, open the Image -> Image Size menu to open the image resizing window.
Step 2
The window will display the original size of the original frame, which can be any. To change the size, enter the desired numbers in the Width and Height fields. The program automatically determines the proportional frame size, so it is enough to enter only the height or only the width of the photo - for example, 800x600 or 1024x768.
Step 3
After the file is reduced in size, open the File menu and select the "Save for web" option. Thus, Photoshop will independently optimize your photo for online publishing and will reduce not only its real size, but also the volume in kilobytes.
Step 4
Select JPEG High in the settings window when saving. Look at the size of the photo and if it suits you, click the "Save" button. If you are not satisfied with the size, slide the settings slider to the right or left until the frame size meets expectations.
Step 5
Save the photo under a new name, which is best written in Latin letters for correct display on the Internet. Now you can publish it on any website, and even users with a slow Internet connection will not experience delays when uploading a photo.


