Nowadays, the presence of an Internet connection on a computer is no surprise. However, few ordinary users will be able to assign a network address to their computer, or, simply put, configure the Internet. As incomprehensible as this procedure may seem, in fact, everything is much simpler.

Instructions
Step 1
The exact method for assigning a network address to a computer depends on the operating system installed on your computer. Within the framework of one article, it is unrealistic to cover all possible methods of settings for various systems, therefore, in this case, the setting will be considered within the framework of Windows XP.
Step 2
The first thing you need to do is prepare all the necessary data for your internet connection. Usually they are located on one or another page of the agreement with your provider, if you want to set standard settings or you can use the settings that you need.
Step 3
Then open the "Start" menu and select "Control Panel". In the window that opens, select the icon with the globe and the Internet cable depicted on it. The icon is named "Network Connections". This item is responsible for all settings that are somehow related to the network.
Step 4
In the window that opens, you can see several icons at once, where each of them, as a rule, displays a particular connection.
Step 5
Creating a new connection is, in fact, the topic of a separate article, so it is assumed that you already have an established connection, the parameters of which need to be changed. In addition, it should be borne in mind that the nature of creating a new connection may differ for different providers.
Step 6
Next, you should select the required connection, right-click on the icon, bringing up the context menu. Then select "Properties".
Step 7
In the window that opens, you will see a small list in which you need to find the item "Internet Protocol (TCP / IP)". Open this item by double clicking.
Step 8
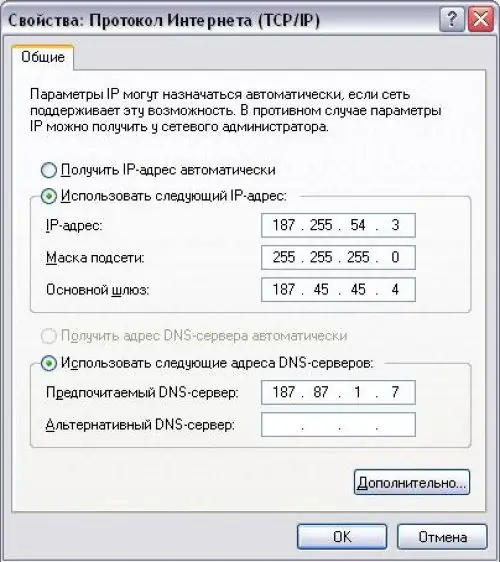
In the window that opens, we are interested in the "General" tab. Here you will see that in fact you have two options - either use automatic retrieval of settings, or specify the settings yourself. Select the second item, after which the settings fields will become available for editing.
Step 9
It should be noted that the first item is used most often in cases where there is a connection to a router that distributes an Internet channel.
Step 10
Carefully fill in the fields, according to the information you have, and then click the "OK" button. The previous window can also be closed.


