You can leave your signature on the photo, for example, with a marker or ballpoint pen. And if your photos are stored in electronic form (in files), then you can use a graphic editor. You can even create your signature once, save and then apply to all your photos. Here's how to do this using Adobe Photoshop SC4.

It is necessary
Graphic editor Adobe Photoshop
Instructions
Step 1
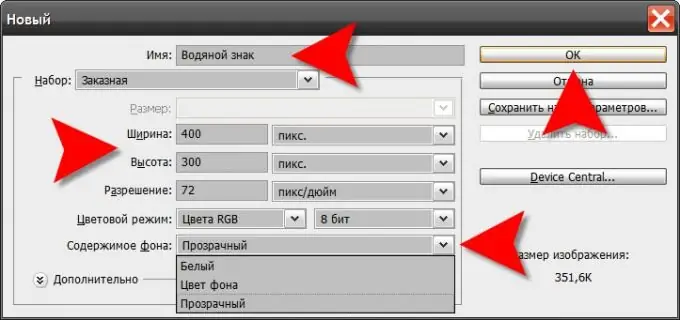
First, you should create your signature in a form that is convenient for later use. After launching Photoshop, open a new document by pressing the CTRL + N hotkeys. In the document creation dialog, immediately specify a suitable name so that you do not have to look for this file for a long time when the need arises for a signature. For example - "My copyright". Set the dimensions of the document with a margin, in the process you will change them. In the Background Content field, select Transparent. Click the "OK" button.

Step 2
Your signature can be text, an image, or a combination of both. Make a simple version for a start - the text one. Turn on the Horizontal Type tool. To do this, just press the button with the Latin letter T. Then press D to set the default colors (white background, black text). Click on the document and start typing your signature text. If you need a copyright icon (©), then press the alt="Image" key and, without releasing it, type 0169 on the additional keyboard.
Step 3
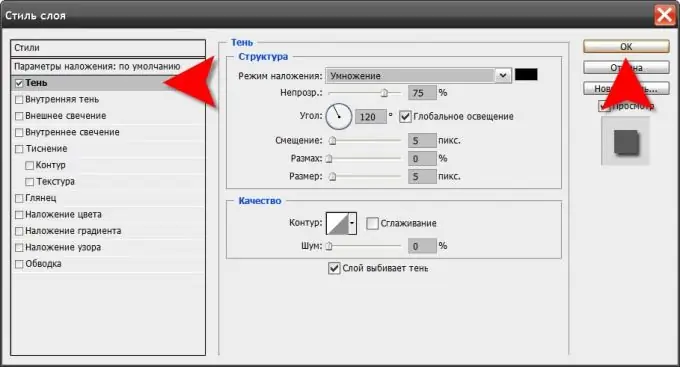
When you're done with the text, you can add some visual effects to it. For example, a shadow. To do this, double-click the text layer in the layers window and in the style options window that will open as a result, select the Shadow effect tab. Here you can set its color, size, distance from the text, transparency, etc. When finished with the settings, click "OK".

Step 4
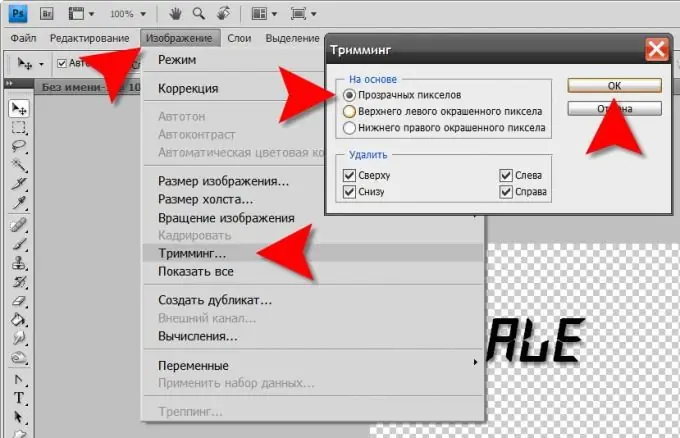
Now remove the extra space around the label: open the "Image" section of the menu and click the "Trimming" item. A window for cropping settings will open - check the box next to the "transparent pixels" label. When you click OK, Photoshop will resize the document to the width and height of your signature.

Step 5
If you want the signature to look like a "watermark", then in the layers window, open the drop-down list next to the "Fill" inscription and move the slider to the very zero. After that, only a shadow will remain from the signature.

Step 6
All that remains is to keep your copyright ready to use. Press CTRL + S, and then click the Save button.
Step 7
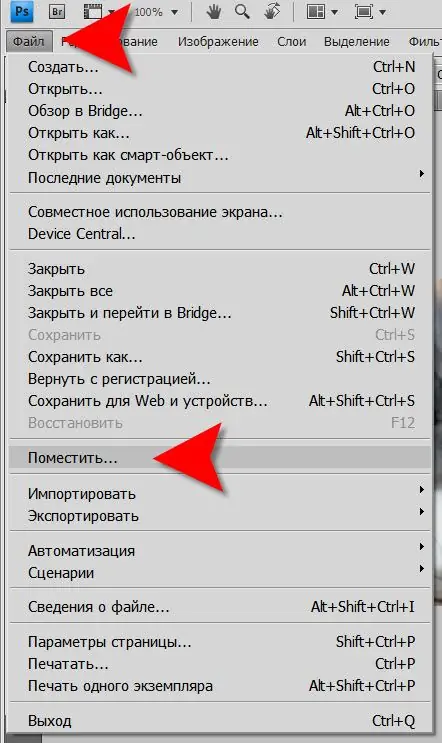
Now, whenever you need to insert a signature into a photo, proceed as follows: first open its file, then in the menu, in the "File" section, select the "Place" line. Photoshop will open a file selection window. Click on the signature file "My copyright.psd" and click the "Place" button.

Step 8
The editor will put the signature right in the center of the photo, and you move it with the mouse to the most suitable place. You can also scale the text here by dragging the corner points of the signature with the mouse while holding down the SHIFT button. Then press Enter to complete the signature insertion procedure.
Step 9
It remains to save the photo with the caption by pressing the hotkeys alt="Image" + SHIFT + CTRL + S. In the quality settings window, select the format and select the appropriate settings, and then click "Save". In the next dialog specify the file name and location to save the photo with the signature and click "Save".


