There are many different utilities to change the properties of video files. If you prefer freeware, use VirtualDub to reduce file size.

It is necessary
- - VirtualDub;
- - K-Lite Codec.
Instructions
Step 1
Download this program from the developers site. Install VirtualDub and run the utility. Open the File tab and select the Open command. Open the video file to convert. Please note that the program supports a limited number of formats. Use a dedicated converter to convert the original format to avi.
Step 2
Wait a while until the video file is fully loaded into the utility window. If the file is not found, install the K-Lite Codec package. Repeat the procedure to open the file.
Step 3
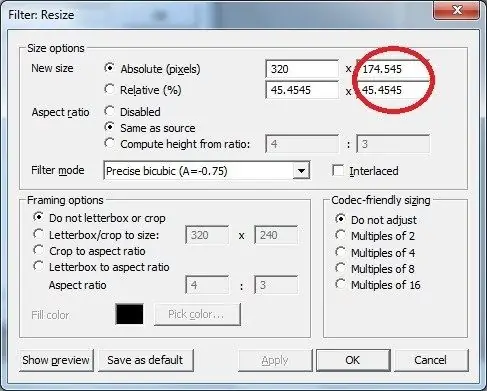
Now open the Videos menu. Go to Filters. Click the Add button and select the desired filter. It is better to use the resize function to reduce the size of the video file. Wait for the new window to start.
Step 4
Check the box next to Absolute (pixels). In the Aspect Ratio menu, activate the Same as source option. This will allow the program to automatically calculate the aspect ratio to avoid image distortion.
Step 5
Now enter a new value for the width of the image. Do not set too low a figure. This will result in a significant decrease in video quality. For the stable operation of the program, one condition must be met: the values of the width and height of the picture must be divisible by 2.

Step 6
Click the Ok button. Open the Video menu again and select Compression. Please enter a suitable codec such as Xvid MPEG-4. Click the Configure button. Set the required video stream parameters. Click the Ok button.
Step 7
If you do not plan to reduce the quality of the audio track, open the Video tab and check the box next to Normal Recompress. Otherwise, the original video file will be retained unchanged.
Step 8
After checking the parameters of the resulting video, open the File menu. Go to Save as AVI. Select a folder to place the file and enter its name. Wait for the program to finish running.


