A boot disk is used to start the operating system from the disk, as well as to install a new Windows operating system on a computer. It's not so difficult to create such a disc with your own hands.

Necessary
- - computer;
- - OS distribution kit;
- - a program for burning discs.
Instructions
Step 1
Copy absolutely the entire contents of the Windows XP installation disc to any folder to make a bootable disc, but make sure that the display of hidden files and folders is turned on in Explorer and that system file protection is turned off. To do this, go to the "Tools" menu, the command "Folder Options" -> "View" (Tools / Folder Options / View), check the box next to the option "Show hidden files and folders" and uncheck the box Hide protected operating system files options. Next, copy the files to the D: / XPSP2CD folder.
Step 2
Copy the files containing the update package (windowsxp-kb936929-sp3-x86-enu.exe) to any folder, for example, D: / XPSP3. Extract the contents of this service pack file to burn Windows to disk. To do this, use any archiving program, for example, WinRar, or go to the main menu, click "Run" and in the window that opens, type D: / XPSP3 / windowsxp-kb936929-sp3-x86-enu.exe -x. Next, a window will open, in it select the folder for extraction - D: / XPSP3. After the end of the process, delete the file with the update package, since you no longer need it.
Step 3
Download and install the program designed to extract boot images - Bart's Boot Image Extractor (BBIE). Install the program to the D: / BBIE folder. Then go to the main menu, select the "Run" command, write the command D: / BBIE / bbie x: (where x is an optical drive with a disk), if necessary, replace the letter. Next, the search for boot images will be performed, followed by extraction into files. Embed the update package in the installation files to continue creating the bootable disk. Go to the main menu, select the "Run" command, enter D: / XPSP3 / i386 / update / update.exe / integrate: D: / XPSP2CD. After that, the package will be installed to the local installation disk. After that, a message about the successful completion of the process will be displayed.
Step 4
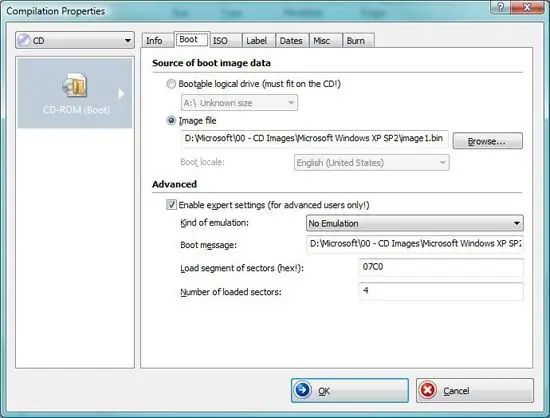
Start the Nero Burning ROM program, then compile the bootable disc. Open the compilation window, go to the "Download" tab. Check the box in the "Boot file" item, select the previously created image1.bin file, check the box next to the "Enable expert parameters" item, set the "Emulation type" command to "No emulation". Set the number of loaded sectors to four. Click OK, add the contents of the D: / XPSP2CD folder to the project and burn it to disk. Windows disc creation is complete.


