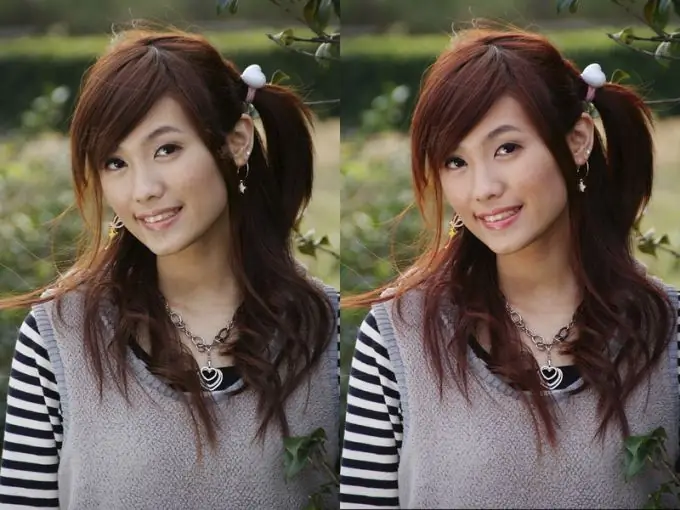
Before you start retouching, evaluate the whole image. Determine if the white balance is correct and perform general color correction. Work with the background, clean it of unnecessary items. Analyze the outlines of the figure, hair, folds on clothes - perhaps some contours will need to be smoothed out. Crop the image.

Necessary
Adobe Photoshop program
Instructions
Step 1
Use the Healing Brush, Spot Healing Brush, and Patch tools to fix skin blemishes. The first two are designed to eliminate minor defects - pimples, moles, small wrinkles. The patch is used to correct larger areas such as bags under the eyes or large and deep wrinkles.
Step 2
To be able to undo your changes at any time, create a new empty layer when working with healing brushes. In the brush settings, select "All Layers". Retouching will be more accurate if you choose the Blend Mode of the brush "Screen". This will tell the program to change only dark pixels. When processing light defects, use the "Burn" blending mode. When finished, lower the Opacity of the Adjustment Layer to bring out the original skin texture slightly.
Step 3
Before using the Patch tool, create a copy of the base layer. Select the Source radio button in the options bar. Create several selections at once to eliminate various defects, this will speed up the work. Always start creating a new selection outside the current one. If, as a result of the work of the tool, you see the border of the "Patches", create a selection using the "Lasso" tool with a feathering radius of 2-3 pixels. Then activate the Patch and drag the selection.
Step 4
The person in the portrait will look much more attractive if you add expressiveness and depth to his eyes. It is necessary to remove red streaks, lighten proteins, emphasize the color of the iris and eyelashes. When treating the eyes, you need to act very carefully. Make sure that the shape is not disturbed by sloppy cloning. Excessive lightening of proteins can make the eyes look lifeless. Take a closer look at the lighting. The lightest part of the iris is always the opposite of the light source.
Step 5
Zoom in and add a new layer. Use the Clone Stamp tool in All Layers to remove the red streaks. With the same tool, you can remove glare from the iris of the eyes. Use the Levels command to lighten proteins. Move the midtone slider to the left. Invert the layer mask (shortcut Ctrl + I) and paint in the whites of the eyes with a small white brush with hard edges.
Step 6
Add a Curves adjustment layer. Set the Blending Mode to Linear Dimmer and lower the Opacity to about 70%. You do not need to change the shape of the curve. Invert the layer mask (Ctrl + I) and paint over the iris with a small hard brush of white color. Apply the Gaussian Blur filter to soften the drawn line. On the same layer, carefully draw the eyebrows. They will look more voluminous.
Step 7
Use the Lasso Tool to select both eyes. Copy the selection to a new layer (keyboard shortcut Ctrl + J). Select the Layer Blend Mode "Multiply" and, while holding down the Alt key, click on the "Add Layer Mask" icon at the bottom of the Layers palette. Take a white hard-edged brush and gently stroke the lashes on the layer mask. The size of the brush should match the size of the individual lashes. Adjust the opacity of the layer.
Step 8
To whiten the teeth, select them with the Lasso tool with a feather radius of 1 pixel. Create a Levels adjustment layer and move the Midtones slider to the left. When processing lips, pay attention to symmetry and clarity of the contours. Soften natural lip wrinkles, but don't completely eliminate them. To give the lips a wet look, select them with the Lasso with a 3 px feather radius and copy to a new layer. Use the filter "Imitation" - "Cellophane packaging". Experiment with adjusting the options and lowering the opacity of the layer.
Step 9
When treating hair with the Stamp tool, remove the gaps between the strands and remove the hair that has come out of the hairstyle. To emphasize the color, add a new layer with the Blending Mode "Soft Light". Take a color swatch using the Eyedropper tool. Brush your hair in the direction of its natural growth. To give your hair volume, treat several strands with a lighter and darker tone when coloring. To soften the strokes, use the Gaussian Blur filter with a large radius and lower the layer's opacity.
Step 10
To accentuate the play of light on the hair, create a neutral layer "Highlight Base". To do this, hold down the alt="Image" key and click on the "Add layer" icon. In the window that opens, select the blending mode "Color Dodge" and check the box "Fill with neutral color (black)". Take a very large soft brush and brush around the highlights of the hair. To process the shadows, create a layer with the Blending Mode "Burn base" with a fill of white. Use a black brush to paint over the shaded areas. Lower the opacity of the created layers.
Step 11
Use the Liquify filter to enhance the model's shape. Before applying it, select the desired fragment. Work carefully using the Warp tool with a large brush and low Density and Brush Pressure settings. This will preserve the texture of the shot.


