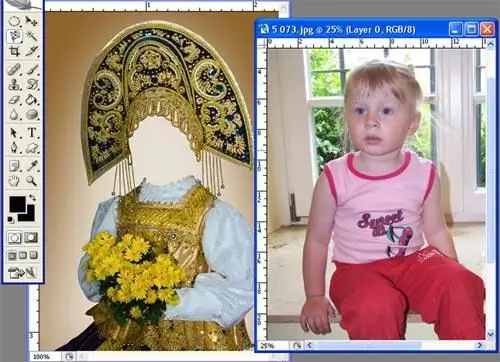
On the Internet, you can find many original photo templates for Adobe Photoshop, in which you can try on a variety of roles, costumes and images for yourself or your friends. In order for the collage to turn out really successful, you need to know how to correctly insert the face from the photo into the finished template, and how to edit it to give the collage authenticity.

Instructions
Step 1
Download a template for a suit that suits you from the Internet, and then open it in Photoshop. Next, open the photo from which you want to take the face to insert into the template. In most templates, when opening, layers with costume elements are not visible - to display them, set the visibility of all layers by opening the layers palette (Window> Layers).
Step 2
Go to the window with your photo. In the toolbar on the left, select the Lasso Tool and outline the head in the photo with a general outline. It is not necessary to do an exact stroke along the path - grab some background around the head. Then press Ctrl + C to copy the selection. Go to the suit template window and press Ctrl + V. A portion of your photo will appear as a new layer in the template.
Step 3
Select the layer with the face and use the mouse cursor to move it in the palette so that the face is under the hairstyle or headdress on the template. Then adjust the position of all the other layers, making sure that the head and neck from the photo ends up behind all other elements of the costume.
Step 4
Now the size and position of the face needs to be adjusted so that the face is proportional to the template. From the toolbar, select the move tool, and then click on the face to display the editing boundaries.
Step 5
While holding down the left mouse button on the border guide points, resize the face horizontally and vertically at the same time by clicking the paperclip icon on the top toolbar, next to the letters WH.
Step 6
Without releasing the left mouse button, continue moving and resizing the face until the face is proportional to the shape on the template, hair style and headdress. If necessary, change the angle of rotation of the head, also moving the face with the move tool. Apply transformation.
Step 7
You can also change the shape and position of the face by calling the transformation tool Ctrl + T. If necessary, slightly change the size and angle of the hat or hairstyle by going to the appropriate layer.
Step 8
Now you need to erase the extra background around the face to finalize the photo. Go to the face layer, select the Eraser tool from the toolbar, set the hardness value to 0% and carefully erase all unnecessary, leaving only the outlines of the face.
Step 9
After that, merge the layers by right-clicking on the topmost layer and choosing Flatten Image from the context menu. Save the finished photo in JPEG format.


