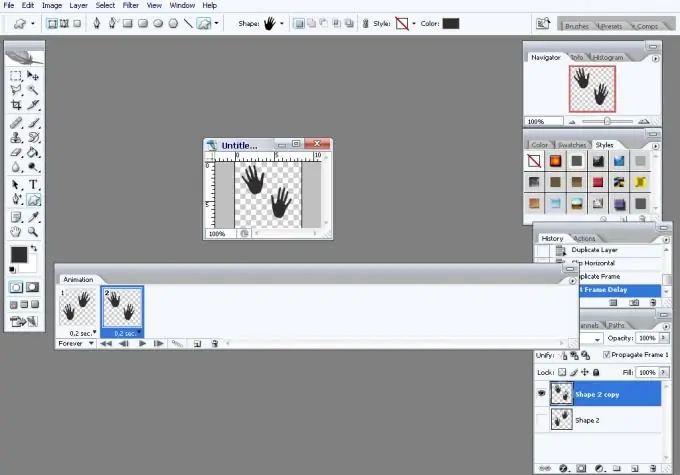
The human eye reacts to movement or the appearance of a new object in the field of vision. Therefore, a moving avatar on a forum or blog page will attract attention faster than a static image. And to make it, in general, is not so difficult. You just need to assemble an animated image from frames. The Photoshop editor can handle this quite well.

Necessary
Photoshop program
Instructions
Step 1
Create a document in Photoshop with the parameters of the avatar you are going to make. You can do it with the "hot keys" Ctrl + N. You will get the same result if you use the New command, found on the File menu. In the window that opens, enter the height and width in pixels. Set the background color to transparent. Click on the OK button.
Step 2
Draw an object that will move on the avatar. To do this, select the Custom Shape Tool. Click on the triangle to the right of the Shape label in the panel under the main menu. In the window that opens with a scroll bar, select the Left hand shape. With the cursor positioned on the document field, drag it to the side while holding down the left mouse button. You now have a handprint image. In the same window, select the Right hand shape. Draw a print of the right palm slightly to the right and above.
Step 3
Merge the outline layers into one. To do this, right-click on the top layer in the Layers palette. Select the Merge visible command from the context menu. From two layers with shapes, you get one layer. It will be the basis for the first frame of the animation.
Step 4
Create a base for the second frame of the animation. Duplicate the palm prints layer by right clicking on this layer and choosing Dublicate Layer Flip the layer horizontally. This can be done using the Flip Horizontal command from Edit.
Step 5
Collect the frames into an animated image. Open the Animation panel by choosing Animation from the Window menu. Make the first frame of the animation by turning off the visibility of the second layer in the Layers panel. To do this, click on the picture in the form of an eye to the left of the top layer. Make a second frame. To do this, click on the Duplicate Selected Frames button. It looks like a sheet of paper with a folded corner and is located at the bottom of the Animation panel.
Turn on the visibility of the second layer with palms reflected horizontally, while turning off the visibility of the first layer.
Step 6
Specify the duration of the frames in the animation. To do this, select both frames while holding down the Ctrl key. Click the arrow next to the frame duration number below any frame. Select the duration you want from the drop-down menu. After turning on the animation playing with the Play button, which is located at the bottom of the Animation palette, look at the result. Make the frames longer or shorter if needed.
Step 7
Use the Save For Web command from the File menu to save the moving avatar in.gif"


