Adobe Photoshop has tools that allow you to flip or otherwise change an image on a layer, including one drawn with the Brush tool. However, this method is not always convenient, and in the graphics editor there are ways to flip or otherwise transform the contours of the brushes even before using them.

Necessary
Graphic editor Adobe Photoshop
Instructions
Step 1
Launch Photoshop and create a new document by selecting the topmost line ("New") in the "File" menu, or by using the CTRL + N hotkeys.
Step 2
Turn on the Fill tool by clicking the corresponding icon in the toolbar or simply pressing the G key. You need to create a background with this tool in order to more clearly see the outlines of the brushes with which you will work.
Step 3
Choose the color that suits you best as the background, and click the only layer in the document so far.
Step 4
Create a new layer where the brush drawing will be placed. This can be done by pressing the keyboard shortcut CTRL + SHIFT + N or by clicking the corresponding icon in the layers palette.
Step 5
Switch the color to the one you want the brush to paint with and press F5 on your keyboard - this will launch the "palette of brushes". The same can be done by opening the "Window" section in the menu of the graphic editor and selecting the "Brushes" item.
Step 6
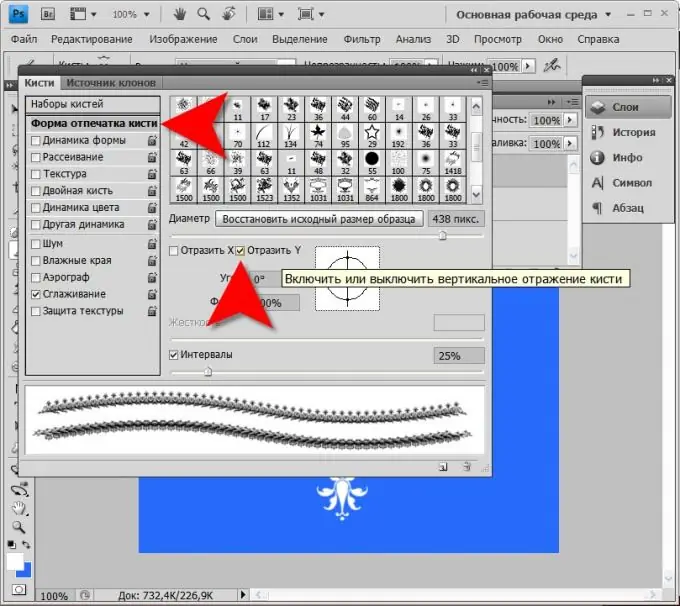
Click the Brushprint Shape row in the Brushes palette. It is located on the left side, just below the "Brush Sets" label. This will make the additional area visible, containing tools for more subtle brush settings.
Step 7
Check the Flip Y checkbox and the brush outline will flip. After that, you can work with an inverted brush.
Step 8
In addition to vertical reflection, here you can also flip the brush in a horizontal plane (checkbox “Flip X”) or rotate it by a specified angle (field “Angle”). In addition, you can change the proportions of the brush - make it more elongated or flattened on the contrary. The "Form" field is intended for this.
Step 9
If you don't want to turn on and off the vertical reflection of this brush every time, then create a new brush with an inverted path. To do this, first make a brush print on a transparent layer.
Step 10
Open the section "Editing" in the menu and select the line "Define brush".
Step 11
Enter a name for the inverted brush and click OK. After that, it will appear in the brushes palette and you can use it.


