Corel Draw is a graphics editor designed for working with vector graphics. It allows you to work with a variety of projects, from logos and web graphics to brochures and signs.

It is necessary
- - a computer with Internet access;
- - Corel Draw program.
Instructions
Step 1
Download the fonts you want to add to Corel Draw on your computer. To do this, go to a site with fonts, for example, https://www.ph4.ru/fonts_fonts.ph4?ja=, select the fonts you like, follow the Download link and download them to your computer. To include a font in Corel Draw, go to the folder where you downloaded the fonts, copy them. Next, go to drive C, open the Windows folder, then the Fonts folder. Call the context menu in the free space and select "Paste". Wait for the fonts to install. Start the Corel Draw program, make sure that the selected fonts are added to the program
Step 2
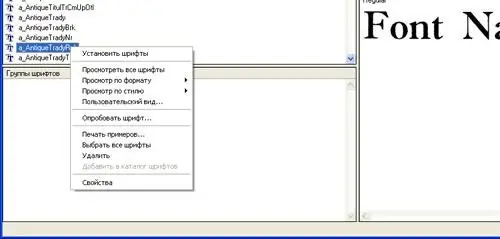
Go to the site https://soft.zerk.ru/font/fontnavigator/, and download the Font Navigator program, this program will allow you to install fonts in Corel Draw. On the website, click the link "Download Font Navigator for free". Wait for the file to download, run it and install the program on your computer. When you start the program for the first time, the Add Fonts Wizard will be launched. Select the folders where the font files are stored to add fonts in Corel Draw. Click the Finish button and wait for the wizard to complete the scan. After that, an alphabetical list of fonts will be displayed on the left side of the window
Step 3
Highlight the desired font, on the right side of the window an example of the text will be displayed, decorated with this font. Call the context menu on any font and select the type of font that you want to install, for example, artistic. You can also send sample text to print to see how the font will be displayed on paper. To add a font to Corel Draw, select it, right-click and select Install Fonts. Wait for the operation to complete, exit the program and start Corel Draw.


