Lack of image clarity is a fairly common defect in conditions when you have to take pictures with your hands and, moreover, with a mobile camera. You can try to eliminate or minimize this drawback of photography using a graphics editor. There are several ways to do this in Adobe Photoshop, the easiest of which is to apply filters from the Sharpen group.

Instructions
Step 1
Launch the graphic editor and load the desired photo into it.
Step 2
Duplicate the layer containing the original image. You can copy the layer by right-clicking on its line in the Layers panel and choosing the "Duplicate Layer" command from the context menu, or simply by pressing the key combination ctrl + j.
Step 3
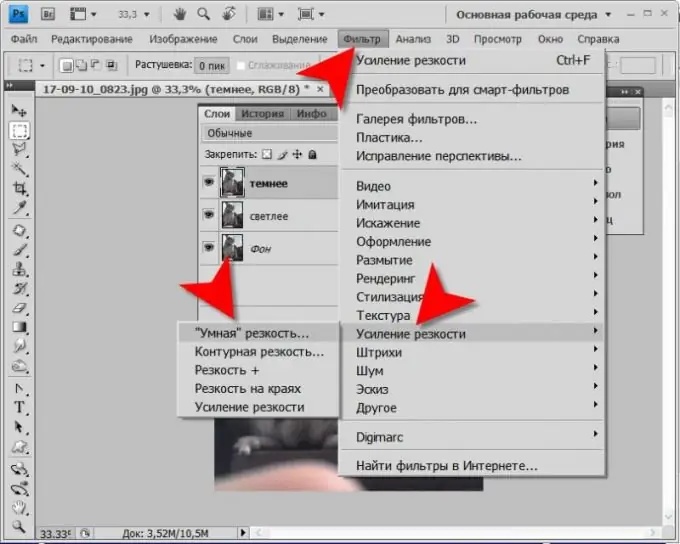
Expand the "Filter" section in the Adobe Photoshop menu, and then the "Sharpening" subsection. Select the line " Smart "sharpness …" - this item reveals a variant of this filter with the most complete set of settings.
Step 4
Select the Advanced checkbox to add two more tabs to the basic settings (Highlights and Shadows) containing settings for highlights and shadows in your photo.
Step 5
Choose the most effective values of the settings on the "Sharpening" tab by moving the sliders in the "Effect" and "Radius" fields. Control the influence of changes on the image quality by the preview picture in the same window. Check how the application of filters from the "Remove" drop-down list will affect the clarity of the photo.
Step 6
Switch to the Highlights tab and use the three sliders to adjust the settings made in the Sharpening tab for the brighter areas. Then do the same on the Shadow tab for the shaded areas.
Step 7
Click the OK button, and the graphics editor will apply the image sharpening filter to the layer with the duplicate of the loaded photo.
Step 8
Try as an alternative to using the other filters from the Sharpening section - they apply similar sharpening methods, but have narrower ranges of adjustments or work only for certain areas of the photo. To do this, create another duplicate of the original layer, as described in the second step, and experiment with it. If necessary, this layer can be removed by right-clicking it and choosing Delete Layer from the menu.
Step 9
Save the photo with your changes. To call the save dialog, you can use the keyboard shortcut ctrl + s. If you want to first optimize the image (find the optimal ratio between image quality and file size), then use the combination shift + ctrl + alt="Image" + s.


