Photos do not always turn out the desired sharpness. This becomes especially offensive when the picture, which you liked so much on the small screen of the camera, when you open it in full size, turns out to be not at all of the quality that you would like. But don't throw it in the trash right away. It is quite possible that it will be possible to increase the sharpness of a photo by means of Photoshop, by making just a couple of mouse clicks.

Instructions
Step 1
There are several ways to sharpen Photoshop. The simplest of them is to use the built-in Unsharp Mask filter. This filter analyzes the photo, calculates contrast transitions on it and makes them even more contrasting. The filter not only increases the sharpness of the photo, but also changes its saturation and contrast. To use this filter, select the following items Filter - Sharpen - Unshar Mask from the Photoshop menu. Set the optimal parameters in the dialog box. Their size will depend on the original quality and size of the processed photo, move the sliders, focusing on the result shown in the preview. Below you can see a variant of the title photo, processed with the Unsharp Mask filter.

Step 2
But another filter, also included in the standard set of Photoshop filters, is considered more versatile and giving better results. Go back to the original shot. Duplicate the image layer by Layer - Duplicate Layer or by dragging the main layer onto the paper sheet button at the bottom of the layers panel. If the layer is locked, double-click it to unlock it. Apply a High Pass filter to the top layer: Filter - Other - High Pass. Don't be intimidated by the resulting effect. The picture has become completely gray, the sliders need to be moved so that the contours of the depicted objects on the resulting image are only guessed. Click on Ok. Now change the blending mode of the layers to Overlay, you will immediately see how sharper and better the photo has become. Bring the layers together by right-clicking and choosing Megre Down.

Step 3
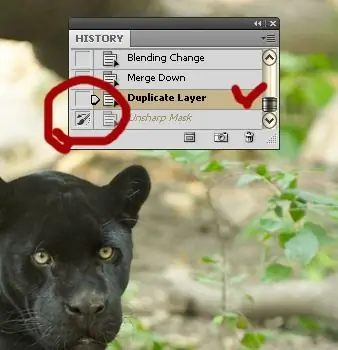
But it is not always necessary to sharpen the entire photo, sometimes you want to emphasize only some fragments, leaving the background, for example, blurred. In this case, you can resort to the following technique. Sharpen your photo using any of the above methods. Better to do this with the Usharp Mask. The whole photo has become sharp, now turn to the History panel and put a mark on it like this

Step 4
Go back one point in the panel. Select the History Brush from the Toolbox and paint over the areas you would like to sharpen. This can be the fur of an animal, eyes in a portrait, and so on. This selective sharpening is often much better overall sharpening. In the same portrait, you usually want to focus on the eyes and lips, but not on the sharply defined skin texture, which may not be ideal. After processing several photos, you yourself will understand which method suits you best, and your photos will become even better.


