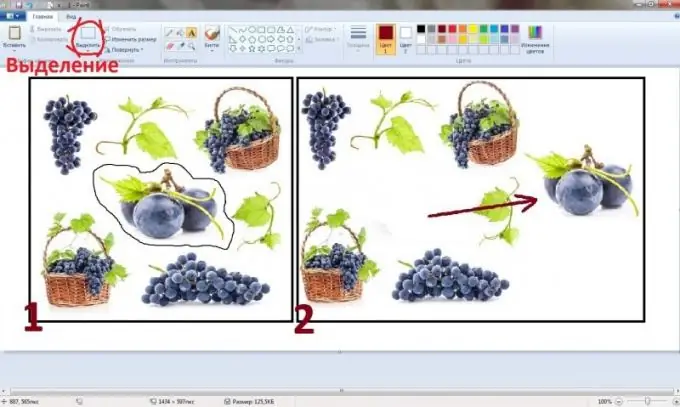
Creation and editing of images in Microsoft Paint is carried out using a standard set of tools, which includes the ability to cut out a certain area of the picture. This is necessary to transfer an object from one part of the drawing to another, or copy it to the clipboard and then paste it into the second Paint file.

Instructions
Step 1
In order to cut any object in Paint, you must first select it. To do this, use the button with the appropriate name, at the bottom of which there is a black triangle that opens the list of settings. The selection area can be of two types: rectangular and arbitrary. The latter is useful when a part of the picture is densely surrounded by other objects that should not fall into the selected area. In the parameters, you can select the line "Select all" - in this case, the entire image will be copied. This command is replaced by pressing the Ctrl + A buttons on the keyboard. Subsequently, the picture can be inserted into another, having previously compressed and made part of the collage.
Step 2
By clicking on the selection button, you need to place the cursor on the border of the cut area and, holding the left mouse button, draw the outline of the object. After making a full turn around it, release the mouse button. The drawn path disappears, giving way to a wide rectangle with dashed sides. Next, you need to place the cursor within this rectangle, press the right mouse button and select the "Cut" line in the context menu that opens. On the left side of the taskbar, there is the same command indicating the same action.
Step 3
By cutting out the object, the user will receive an empty white area, which will later need to be filled with a background or filled with another image, if the file is still needed and cannot be sent to the trash. In the future, the cut out part of the picture can be inserted, both into the same image, and into a separately opened Paint file. This is how collages are made with the help of a graphic editor, or one drawing is completed with details from another, for example, when transferring the face of one person to a completely different photo.
Step 4
In the selection options, which are opened by pressing the arrow below the "Select", there is a line "Transparent selection". By putting a check mark opposite it, the user, moving the drawn path with the object inside, inserts not the entire area separated by the line, but only the shape located inside. The only condition is a pure white background. If the contour touches at least the edge of another object, then such a "transparent" movement will fail. You can select either with a rectangle or with an arbitrary line. If the objects are located on a uniform background of a different color, it can be changed to white, and after cutting and pasting in another place, it can be changed to color again.


