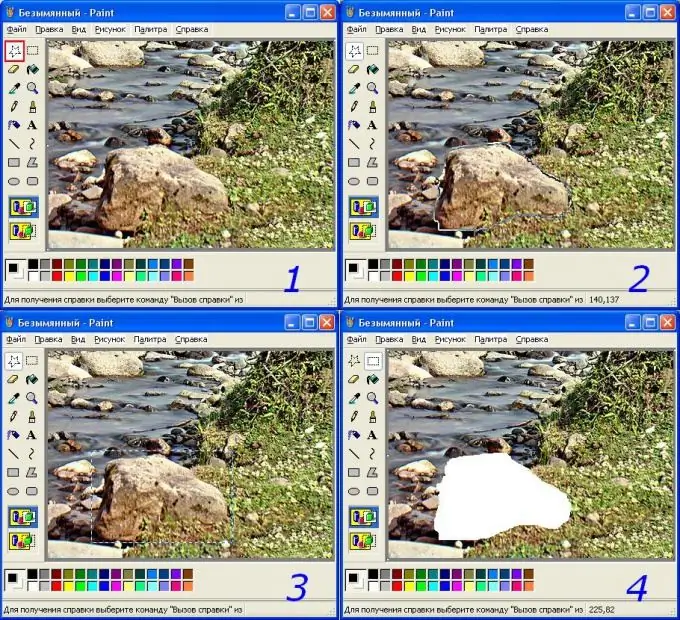
Designers aren't the only ones who have to work with images. So, for example, sometimes you need to cut out an object from a photograph. Consider clipping an element from a photo in three of the most famous image editors.

Necessary
Graphics editor
Instructions
Step 1
Microsoft Paint. For the selected photo with a rock, the "Freehand selection" tool is suitable. Select it (step 1 in Fig. * Insert *) and, holding down the left mouse button, draw a circle around the object. It will look like in step 2. When the line is closed, when the mouse button is released, the selection will take the form of a rectangle (step 3). Do not be alarmed - the fragment selected by the curved line will remain the same. Then you can copy or cut the fragment to the clipboard or delete. To do this, you can right-click on the selected area of the image and select the appropriate action (copy, paste or clear). You can also click the "edit" section of the menu and select the desired action there. Or use the keyboard shortcuts Ctrl + C (copy), Ctrl + X (cut) and Del (delete). The photo after cutting or deleting a fragment will look like in the 4th example.
Step 2
MS PhotoEditor. This graphical editor supplied with MS Office can only select a rectangular area. To do this, you need to open the image and click on the "selection" tool (highlighted in the 1st example of the figure * insert *). Next, holding down the left mouse button, you need to select the required area of the photo (step 2). After releasing the button, the selection will take the form shown in example # 3. At this stage, you can resize the selection. To do this, you need to move the squares on the line in the desired direction. Actions with selection are the same as in Paint.
Step 3
Adobe Photoshop. This editor has much more possibilities for working with images. There are three only tools for selecting arbitrary areas. They, like all other instruments, are grouped and turned on by right-clicking on the cell with the active instrument. The right button calls up the available options, and the left one turns on the desired one. There are three tools in Photoshop for arbitrary selection: lasso (example 1 in Fig. * Insert *), this tool is similar to the one in Paint; rectilinear lasso (example 2) - sequentially, by clicking the left mouse button on the contour of the object, select the desired area with straight lines. The third tool is the magnetic lasso (example 3). It allows you to automatically select objects along the border of colors. The first click sets the starting point of the "trajectory", followed by additional points (for greater reliability). To complete the selection, as in other cases, you need to close the selection line and press the left button again.
Once the selection is complete, you can use the same tools as for other editors. Example 4 shows a menu invoked by right-clicking on a selection.


