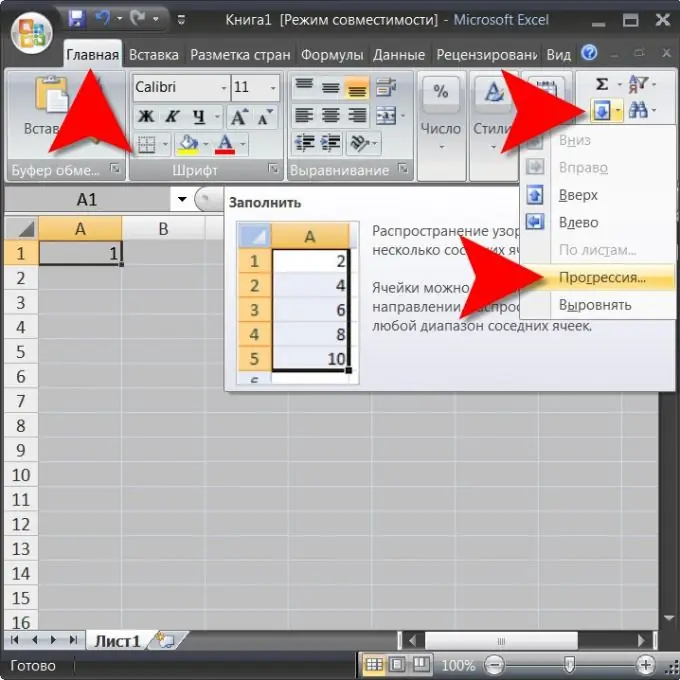
Microsoft Excel is the most common spreadsheet editor and if you need to number cells in a table, then the easiest way is to use it. Moreover, if necessary, ready-made tables from the spreadsheet editor can be easily transferred to the Word text editor.

Necessary
Microsoft Excel 2007 Spreadsheet Editor
Instructions
Step 1
Place the cursor in the cell of the table with which the numbering should begin, and enter the first number of the sequence in it. It can be zero, one, negative number, or even a formula that gives a numeric result. After the value is entered and the Enter key is pressed, the cursor will move to the next cell - return it back to the cell where the numbering starts.
Step 2
Open the Fill drop-down list in the Edit group of commands on the Home tab of the Excel menu. There is no caption on the icon for this command, but a blue arrow pointing down is shown on it. In the drop-down list, select the "Progression" line to open the settings window for filling cells with numbers.
Step 3
In this window, check the box next to the "by columns" label if the numbering of the cells should go from top to bottom. If you need to number cells from left to right, then put a check mark next to the inscription "by rows".
Step 4
Leave a mark at the inscription "arithmetic" if you need simple numbering - that is, such that the next number is obtained by adding a constant number ("step") to the current number.
Step 5
Change the value in the "Step" field if the increment of numbers should be different from one. For example, to make the numbers only odd, enter a two in this field. By default, it is one - with this value, the most common numbering order is obtained.
Step 6
Enter the last number in the "Limit" field.
Step 7
Click the "OK" button and the editor will fill in the specified number of cells with numbers in the order you specified.
Step 8
If a small number of cells are required to be numbered, the procedure can be greatly simplified. Enter the initial value in the first cell, the next in the second, then select both cells and move the cursor to the lower right corner of the selection area. When the cursor icon changes (becomes a black cross of a smaller size) press the left mouse button and drag the selection in the required direction to the final cell of the future numbering. When you release the button, Excel will fill the entire selected range with cell numbers.


