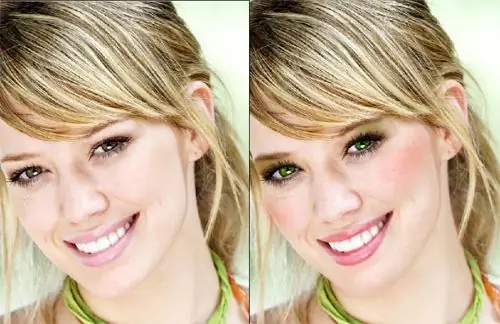
Professional makeup artists apply makeup in several stages. First, they mask skin imperfections with a corrector, then tint and emphasize facial features with shadows or blush. Then the eyes are highlighted with the help of shadows and added volume to the eyelashes. To top it off, apply lipstick to make the lips look fuller and more vibrant. Digital makeup in Adobe Photoshop allows you to do the same, and even a little more.

Necessary
Tools: Adobe Photoshop
Instructions
Step 1
Open the image in Adobe Photoshop (Ctrl + O).
Step 2
Digital makeup in Photoshop, like traditional makeup, starts by hiding the biggest imperfections of the skin, such as acne, localized redness or oily sheen. To do this, use the Patch Tool (J). Select this tool in the sidebar on the left, draw a circle around the area of skin that has a flaw, and then drag the selection to the side. In this case, the "bad" area of the skin will be replaced by the patch that you indicate. Remove all major flaws in the same way.
For more meticulous work, use the Healing Brush (J).
Step 3
To emphasize the shape of the face and make the face more expressive, take with the Eyedropper Tool (I) the shadow color from the photo, select a small brush (B) with soft edges and an opacity of about 15-20 percent and shade the oval of the face and neck. Likewise, highlight the cheekbones and cheeks. To do this, draw a blended line starting from the middle of the ear towards the mouth, and then go up a little.
Step 4
Create a layer. In the top menu "Layer" click "New" and then - "Layer". Pick a color for the blush and use a soft large brush to paint the color on the cheeks. Then, in the Layers panel, select the Blending Type "Color Burn" and experiment with a numerical value for the "Opacity" parameter.
Step 5
Take a small brush, choose a color for the lips and apply the color, being careful not to go beyond the lip line. Then in the Layers panel (F7) set the layer overlay type to "Overlay" and select the optimal opacity value.
Step 6
Create a layer, take a brush (B) of a suitable size and paint over the pupils. Then set the blending type to "Overlay" in the layers panel (F7) and adjust the opacity. If there is redness on the whites of the eyes, desaturate it with the Sponge Tool (O).
Step 7
Since hair is difficult to modify, special brushes are used to create eyelashes in Adobe Photoshop. Create a layer. Take a suitable Eyelash Brush (B) and click it within the image. An eyelash will appear, which you just need to adjust to the required size and angle of inclination. To do this, go to the Free Transform mode and then Warp (from the Edit menu). A fine mesh will be superimposed on the image with control markers and lines, with the help of which you can position the eyelash as needed.
Step 8
Create a layer. Take the Blurred Brush (B) and paint light brown shadows over the lids. Then choose a different color (usually matching the eye color) and add some more shadows on top. Choose a Blending Type for the Multiply layer and lower the Opacity. To do this, open the Layers panel, which opens by pressing the F7 key.
Step 9
Save the finished result (Ctrl + S).


