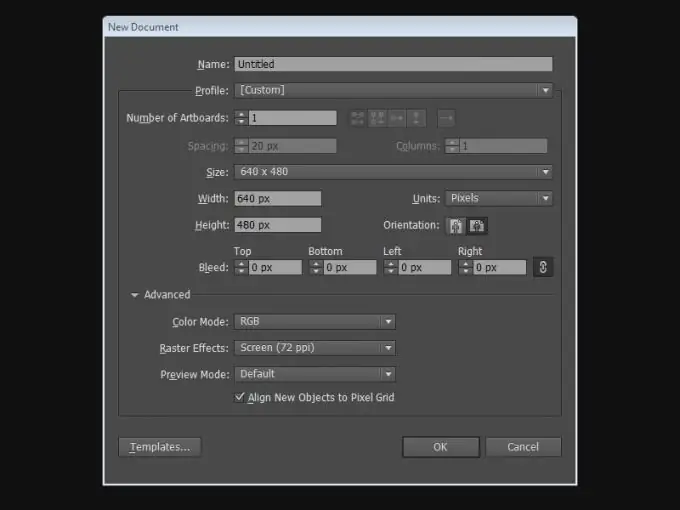
You can create a new document from the splash screen, the File> New menu, or from the File> Device Central menu. To open the splash screen, go to Help> Welcome.

1. Do one of the following:
- If Adobe Illustrator is running, go to File> New and choose the desired document profile from the Profile menu.
- If the splash screen is open, select the required document profile from the Create New list.
2. Enter the name of your document in the Name field.
3. Specify the number of artboards in your document and the order in which they appear on the screen:
- Grid by Row - Arranges artboards in a specific number of rows. Enter the number of columns in the Columns field. By default, this option is set so that the artboard grid is as close to square as possible.
- Grid by Column - Arranges artboards in a specific number of columns. Enter the number of rows in the Rows field. By default, this option is set so that the artboard grid is as close to a square shape as possible.
- Arrange by Row - Arranges artboards horizontally.
- Arrange by Column - Arranges artboards vertically.
- Change to Right-to-Left Layout - changes the order of the artboards from right to left.
4. Specify the distance between the artboards in the Spacing box. This parameter is applied both horizontally and vertically.
5. Specify the size, units, and orientation of the artboards in the appropriate boxes for Size, Width, Height, Units, and Orientation.
6. Specify the offsets from each side of the artboards in the Bleed field group. To specify different values for each side, click on the chain link icon on the right.
7. Expand the Advanced menu to configure the following parameters:
- Color Mode - defines the color mode of the document.
- Raster Effects - Determines the resolution of raster effects in the document. It is especially important to set this parameter to High (300 ppi) if you plan to send the image to print on a high-resolution printer. The Print document profile sets this value by default.
- Transparency Grid - Determines the transparency grid options in documents using the Video and Film profile.
- Preview Mode - sets the way the document is viewed (you can change it at any time in the View menu):
- Default - displays the project as vector objects in full color mode, changing the viewing scale preserves the smoothness of the lines.
- Pixel - displays the project with rasterization applied. This mode does not rasterize the content, but simulates the situation if the objects were rasterized.
- Overprint - Represents an "ink look" that simulates blending, transparency, and overprinting of colors in printing.


