An image with a transparent color is easy to create using Adobe Photoshop. This may be required, for example, for a logo that will subsequently be superimposed on various photographs. In order not to cut the background from the logo for each illustration, you can make a.

Necessary
Tools: Adobe Photoshop
Instructions
Step 1
Create an image or open the finished one in Adobe Photoshop (Ctrl + O).

Step 2
Then create an empty layer. To do this, go to the "Layers" menu, open the "New" submenu and select "Layer". A window will appear in which you can set the initial parameters of the layer, such as the type of overlap, color, opacity and some others. Leave everything as it is and click "OK".
Or click the button next to the trash can in the layers panel.
Step 3
Expand the layers palette. To do this, select "Layers" (F7) from the "Window" menu.
Step 4
The layer you created will be located at the top called "Layer 1". Drag it with the mouse under the bottom layer. If you fail, then the bottom layer is blocked. Unlock it and try again.
To unlock a layer, double-click on it and click "OK" in the window that opens.
Step 5
Make sure the new layer has a transparent background. You can find out by its icon in the layers palette: a transparent image in Adobe Photoshop symbolizes a drawing that resembles a chessboard. If it is not, select the layer with the mouse, then select the entire image ("Selection" - "All"), and press "Del" on your keyboard.

Step 6
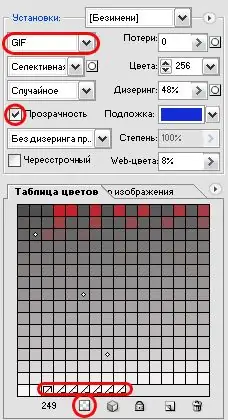
From the File menu, navigate to Save For Web & Devices. A window with many settings will open. Select the.

Step 7
Select the color you want to make transparent with the Eyedropper tool. Alternatively, you can select a color from the Color Table panel. This panel displays all the colors that are present in the document.
Step 8
After you select a color, find the button marked with a red circle and press it. This button converts the selected color to transparency.
Step 9
If you want to make not one, but several colors or shades transparent, continue to select the swatches with the eyedropper (or in the color table) and convert to transparency using the above button.
All changes that affect the image are displayed in real time in a special window that takes up the lion's share of the workspace. So you can control every step of this process.
Step 10
When you are satisfied with the result, click "Save", after which a window will open allowing you to specify where the finished image should be saved. Select a directory and click "Save".


