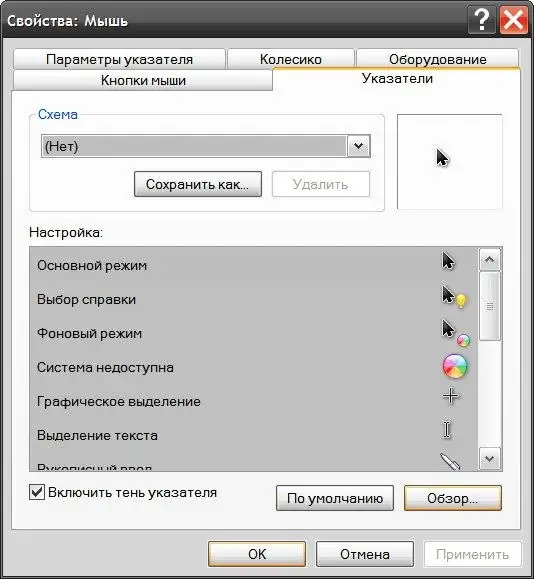
The Windows operating system has a number of predefined cursor sets by default. But if the user wants to install his own selection of mouse pointers, then this option is provided in the graphical interface of any modern version of this OS.

Instructions
Step 1
If you have a set of cursors that are not available in the standard themes of your operating system, then start by creating a separate folder for the new set. The OS stores files of its own cursors in a directory named Cursors, placed in the system folder. Most often, this folder should be found on the C drive in the windows directory - start Explorer (ctrl + e) and navigate to this folder. Right-click the free space in the Cursors folder, open the New section in the context menu and select the Folder line. Then enter a name (for example, NewCursors) and hit enter. Unpack or move files with the cur or ani extension from the new set of cursors into the created folder.
Step 2
Open the "Control Panel" by selecting the appropriate item in the main menu of the system on the "Start" button. If you are using Windows XP, either select the Mouse component or go to the Appearance and Themes section and click the Mouse Pointers link in the left pane. If you have Windows Vista installed, then select "Hardware" and in it click the link "Mouse". In Windows 7, enter the word "Mouse" in the search field of the main menu of the system and click the link with the same name in the search results.
Step 3
Click the Pointers tab in the Mouse Properties window. The field "Settings" lists the options provided in the operating system for the appearance of the cursor for each design of the graphical interface. Highlight the first line in this list, click the "Browse" button, find the required file in the folder you created and click on the "Open" button. This operation must be repeated for each line of the list.
Step 4
Save the diagram with modified mouse pointer settings if you do not want to repeat this operation when you need it again. To do this, use the "Save As" button. Then click OK and the changes will take effect.


