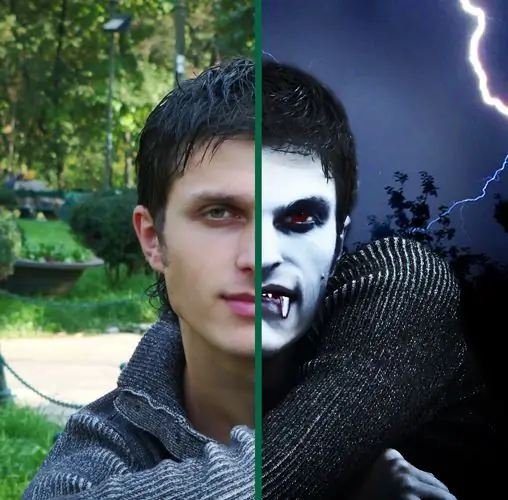
If you want to give your friend a cool gift - turn him into a vampire. Just don't bite him for real - this is not accepted in our society. Better use Adobe Photoshop to make a friendly cartoon.
Necessary
- To complete this instruction, you will need some basic knowledge of the Photoshop program, namely:
- - you should have an idea of what layers are and how to work with them,
- - and also your ability to use a brush in Photoshop will come in handy.
- Otherwise, even inexperienced users will be able to follow the recommendations below.
Instructions
Step 1
1. Upload a photo of the friend you want to pin up. If you already know how to separate a person from the background in Photoshop, then you can do this now - at the preparatory stage, so that later you do not waste time on this. If you don't know how, it doesn't matter, you can leave the photo intact.
Step 2
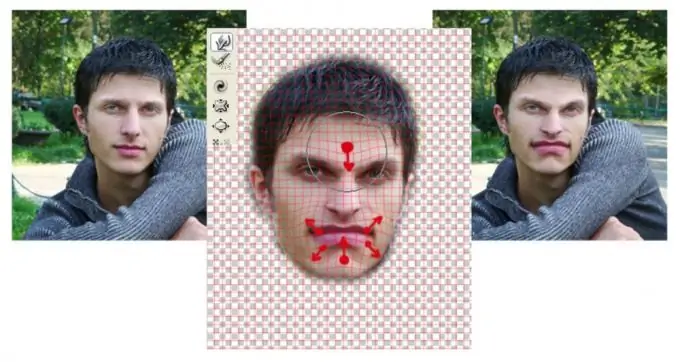
We give our hero an appropriate facial expression. For this we will use the Liquify transformation (menu Filter> Liquify). Vampires, as the legends say, are gloomy and unhappy people, so your friend, if he was a representative of this tribe, most likely would have frowned eyebrows. To do this, use the Forward Warp tool and a medium-sized brush to pull his forehead down a little. In addition, it is common knowledge that vampires are famous for their mouth, from which terrible fangs periodically stick out. With the same tool, stretch the edges of the lips in different directions to give the mouth the appropriate shape. If you overdid it, remember that you can always press Ctrl + Z and undo the last actions, or use the Reconstruct Tool, which returns the original linearity of the picture.
Step 3
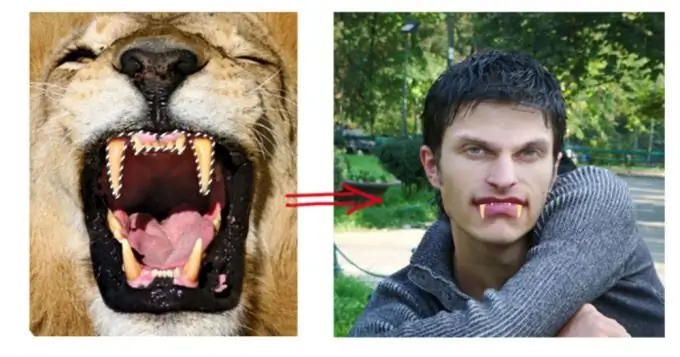
Now we will endow our character with sharp fangs. They can be drawn if you have the talent of an artist: for this it is better to create a separate layer on top of our image and depict teeth of the desired shape and size on it. You can borrow teeth from any animal of your choice - a lion, a dog, a walrus, a rabbit, etc. To do this, you need to find and upload into Photoshop a photo where the grin of the animal is visible, then use the Lasso tool to circle and select the required number of teeth. Now select Edit> Copy from the menu or simply press Ctrl + C and return to the working window with our sad friend. Paste the trophy by pressing Ctrl + V or choosing Edit> Paste.
Step 4
Of course, other people's teeth will be slightly the wrong size and in the wrong place in the picture where we need it. Press Ctrl + T (or select the Edit> Free Transform command from the menu) and, using the square handles at the corners of the layer, move, stretch and unfold the teeth until they fit our character. Excess can be removed using the Eraser tool.
The color of the teeth, if they are strongly disharmonious with the photo, can be corrected using the Hue / Saturation command.
Step 5
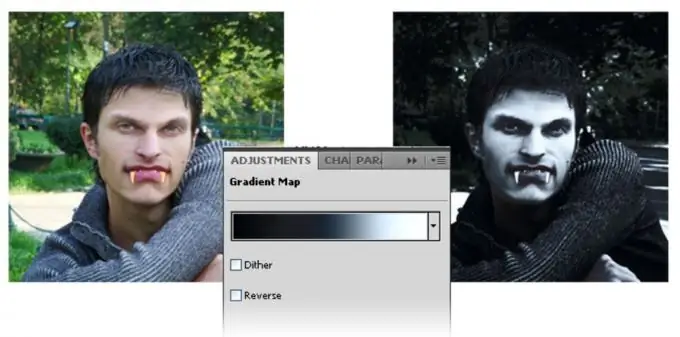
Remember that vampires are most often looking for their prey in the middle of the night, so the color and lighting of the photo must be appropriate. To create this, we'll use a Photoshop gimmick like the Gradient Map layer. Create such a layer through the Layer> New Adjustment Layer> Gradient Map menu or by clicking the corresponding button at the bottom of the layers panel, while choosing the Gradient Map type.
Editing the gradient - we type its constituent colors: its left side should be dark, dark blue-gray shades, the right side should be light, blue or whitish. Let's see how the image in the picture changes depending on what color and where we add the gradient. Create the illusion of a thunderous night.
Subsequently, you can adjust the Opacity of the created layer, leaving it in the range of 70-80%, so that the details of the clothing retain the color difference, visible even in the light of the moon and the glare of lightning.
Step 6
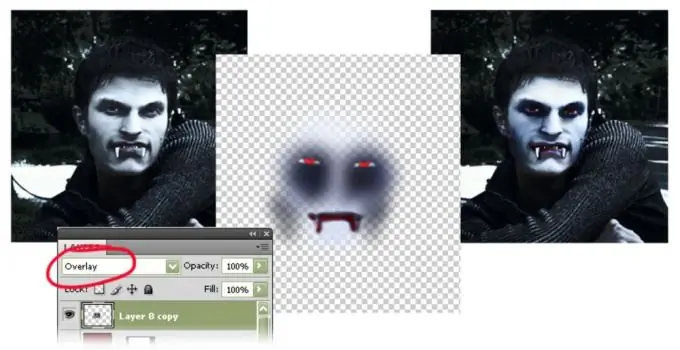
Now you can go back to cosmetic editing of the face, add characteristic features. Create a separate layer (menu Layer> New> Layer or click the button at the bottom of the layers panel). Switch the created layer to Overlay mode. Now the light strokes on this layer will lighten the original image lying under it, and the dark ones, accordingly, will apply a shadow. Take a brush, choose the softest version of it and apply "make-up" - with a medium-sized brush, slightly whiten the face, apply shadows on the areas of the face under the eyes and on the cheeks. Use a miniature brush to add an ominous glitter to the eyes and a red iris. Finally, the most delicious thing is to paint the mouth and fangs of our character with red and dark tones, depicting caked blood.
Step 7
Your friend has changed. For the ideological completion of the canvas, you can add a background image - something ominous. (How to add a background has been described many times on the Internet.)
You can save a file to send to a friend using the File> Save for Web command or by pressing the Ctrl + Shift + Alt + S keys. In the window that opens, before saving, you can select the file size and format in which it will be saved, for example, in JPG. The very same multi-layer composition, you can save (File> Save) in PSD format for further editing and improvement.


