In the NTFS file system of Windows OS, to change user rights to perform any operations with files and folders, you need to edit entries in the "Access Control List" (ACL). The OS provides a simplified and more detailed mechanisms for such editing. Depending on which of them is activated on your system, the sequence of steps to enable access to the folder will be slightly different.

Instructions
Step 1
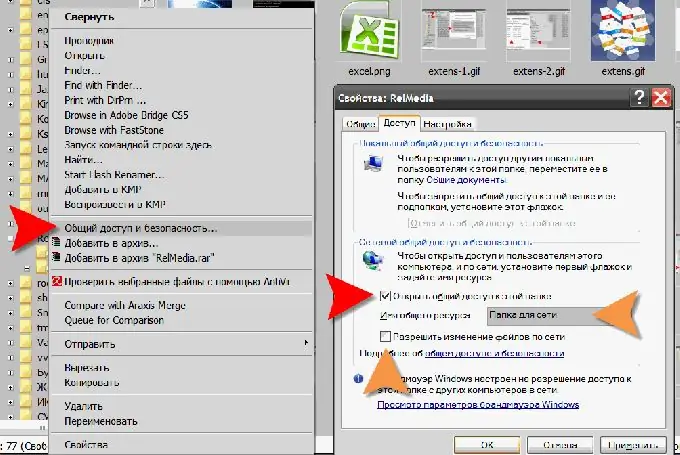
Start Windows Explorer by double-clicking the My Computer shortcut on the desktop or by pressing the CTRL and E keys. Navigate to the folder you want to edit the permissions for. Open the context menu by right-clicking the folder icon and select Sharing and Security.
Step 2
Go to the "Access" tab of the opened folder properties window. Depending on whether the Easy Access Control option is enabled in your system settings, the set of settings placed here will be slightly different.
Step 3
Check the box next to Share this folder. Here you can also specify an alias for this directory, under which it will be visible to network users. To do this, use the field "Share name" (or "Share"). If the rights of external users should include the ability to edit and delete files in this directory, then check the box "Allow editing files over the network." Such a field will be present on this tab only if Simplified Access Control is enabled, and if disabled, a button labeled "Permissions" will be placed here. Clicking the button opens a window with a list of individual users and entire groups that are listed in the ACL for this folder. By selecting a line and setting or unchecking the checkboxes of the list of file operations below, you can customize user rights in more detail ("security policy"). You can even create a special group or user just for this folder by clicking the "Add" button.
Step 4
Click OK when you finish changing the settings and the new settings will be committed to the ACL for this folder.


