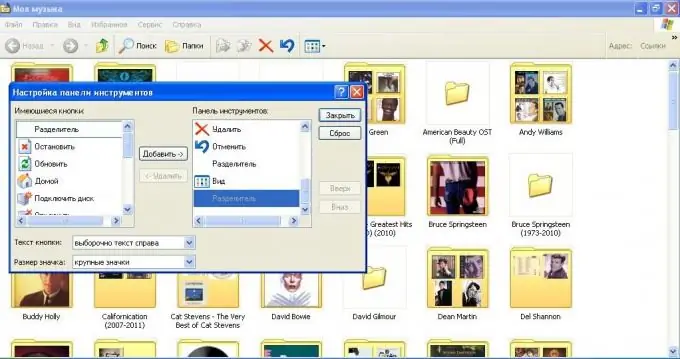
It often happens that the user needs additional menu buttons when working with files and folders, or when working in a browser. They can be configured without installing additional software, and the process itself will take a few minutes.

Instructions
Step 1
Open any folder on your computer. In the top menu, select "View", then "Toolbars" and "Settings". You will have a new window where you can add any buttons you want to the toolbar at the top. Here you can also customize their appearance, icon size, captions, and so on.
Step 2
If you need to add buttons to the Internet Explorer bar, open the browser and also select the appearance settings, as in the previous paragraph. Often, new versions of this browser do not support the standard menu appearance, in this case, find the button for configuring the browser appearance settings and add the icons you need to work.
Step 3
If you want to change the menu sequence, go to the "Service" item, then select the "Settings" command. A new dialog box will appear on your screen, select the toolbar or menu in it that you would like to change or move. Use the arrow keys to change the position of the menu buttons according to the desired sequence.
Step 4
If you want to change the content items of the quick access menu located on the taskbar, just make sure that the corresponding option is checked in the settings, then drag the shortcuts of the applications that you would like to see there to this panel. Removing unnecessary ones occurs in the opposite way, or by right-clicking and selecting the desired item.
Step 5
If you want to reset all the changed settings of the toolbars, in the "Tools" menu, select the "Settings" command, then go to the "Commands" tab in the window that opens, select the desired items and click the "Reset All" button. After that, the values for these positions will be those that were originally on your computer after the installation of the system.


