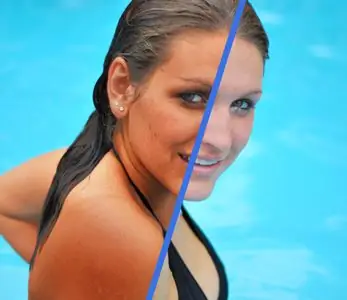
How sometimes you want to show off summer photos to your friends, but here's the bad luck - the summer is cloudy, the tan does not stick - in the pictures, the faded skin color does not create the desired mood. Well, then it's time to resort to the wonders of Adobe Photoshop.

Necessary
To complete this instruction, you are recommended to have a basic knowledge of Adobe Photoshop, namely: to understand what layers and Photoshop masks are, and also to have at least a little experience in using a Photoshop brush
Instructions
Step 1
Let's make a reservation right away that the task of image processing associated with the correct reproduction of the color and texture of the skin is one of the most difficult. Possession of all the nuances of this business is available only to professional color correctors and comes to them as a result of long work. After all, it is worth a little "too clever", and the photo immediately becomes unnatural, and annoying unfinished details betray a forgery. But a few fairly simple steps of this instruction will be able to bring the image in your hands closer to the expected appearance, if you know the measure in the dosage of parameters.
Load the image. The first and most difficult stage is ahead of you. Logically, in order to change the color of the skin, you need to somehow select in the image all the areas where, in fact, this skin is.
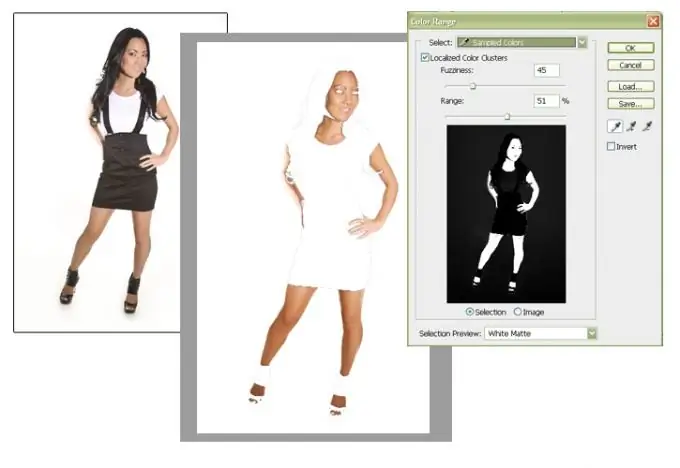
To begin with, you can try using the Color Range selection tool (Select> Color Range), which can automatically recognize the zones we need. Setting the parameters is done in the following way: with an eyedropper tool, the main skin color is indicated on the image, then, holding the Shift key, skin areas of other shades are added to it. If the selected range accidentally includes areas that do not match in color, they can be excluded by pointing to them while holding down the Alt key. The ultimate goal of this procedure is to create a black and white mask in the preview window, with areas of the skin shown in white, and areas that do not need to be repainted in black. Using the Fuzziness engine above the preview window, we achieve that the mask gains contrast, and the selected areas are radically different.

Step 2
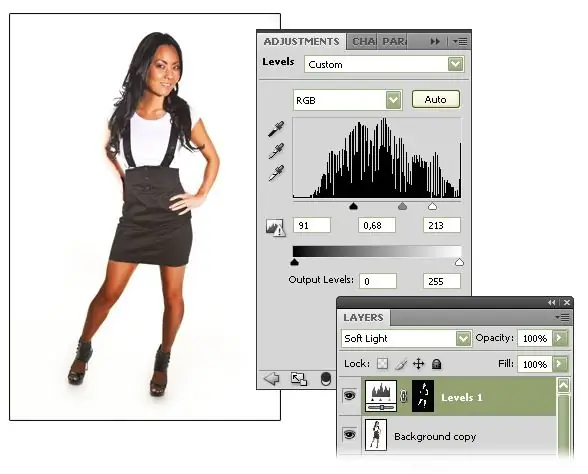
We check the completed operation. Click OK in the Color Range window - we see how the selection outline began to flicker around the areas we need. Create a new Levels adjustment layer. To do this, you can use the menu Layer> New Adjustment Layer> Levels or create such a layer by clicking the icon at the bottom of the layer manager. In the settings window that appears, change the levels approximately as shown in the figure. In this case, set the layer blending mode to Soft Light. If you are lucky, and the automatics performed the first stage correctly, then the model's skin will acquire an obviously darker and more contrasting shade of southern tan.

Step 3
But fortune can turn its back on us, and instead of an even tan, we will see the torn edges of the spots of an incomprehensible shade. This means that the mask we received at the first stage was not perfect. You can try to repeat the steps for selecting Color Range again, slightly changing the parameters. After a few tries, you will most likely be able to create the most acceptable mask by learning from your own mistakes. Unfortunately, it will have to be tweaked manually.
In the layer manager, select the adjustment layer we created, and click on the part of it where the mask is schematically shown. Now we will modify the mask itself (by the way, information that the mask is being processed can be seen in the header of the working window with the image - pay attention to the very end of the line, after the file and layer name):
- firstly, you can try to make the edges of the mask a little blurry, this is more natural. To do this, use the blur filter (Menu Filter> Blur> Gaussian Blur), where we select the blur diameter, visually controlling the final image.
- secondly, you can use a Photoshop brush, the color of which, varying from black to white, will either add something to our mask or exclude it from it. So you can exclude some details from the painting - usually eyebrows, lips, individual curls, small details of clothing, etc. On the contrary, it is often necessary to recolor both areas of deep shadows and colored highlights on the skin, which could be considered foreign by the automation. With a large soft brush, we can smooth out large areas of the skin, if for some reason they were cut by the mask.
- thirdly, using the Lasso tool, you can additionally select areas that were not accurately recognized by the Color Range tool, but in fact should not fall into the effect zone. For example, if the model is wearing a beige dress, it is likely that the fabric, which is similar to the color of the skin, will also be dyed. This violates our plans, so we need to manually select the outline of the clothes and remove this area from the mask of the adjustment layer.
Step 4
In addition, a situation may arise when the skin color in the original image - due to lighting or imperfections of the camera - has deep deviations from the natural beige shade, then with the darkening effect such skin will not be covered with a chocolate tan, but with burgundy inflammations or gray-blue stains of dirt. …
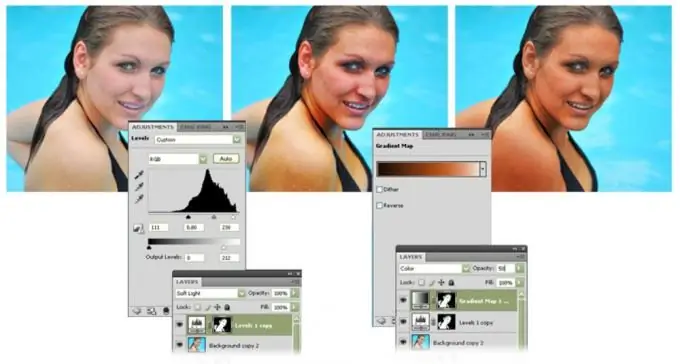
Let's create another layer to correct this problem. This will now be the Gradient Map layer (menu Layer> New Adjustment Layer> Gradient Map or the icon at the bottom of the Layer Manager). The mask for this layer does not need to be re-created - you can borrow it from the already created one: hold down the Control key, click on the rectangle with the mask from the Levels layer, we will see how flickering outlines reappear in the image - the created layer inherits this mask.
So, let's create a gradient from the colors we need for a nice chocolate tan. Visually make sure the colors look natural in the context of the lighting in the original photo. The transparency (parameter Opacity) of the resulting layer can be varied in order to keep the middle ground between so that the skin color is even, on the one hand, and on the other, so that the picture does not look plastic, devoid of natural color glare and nuances.

Step 5
Experiment with the parameters of both created layers - the colors of the gradient, the levels of darkness and contrast, the opacity of the adjustment layers. Remember that even if light color correction does not 100% complete the task, it will preserve the realism of the image, rather than a radically applied effect will finally kill all hopes that the viewer will believe in the reality of such a skin color.


