Diverse and original textures can expand your possibilities when working with graphics in Adobe Photoshop. By default, the program contains not so many attractive textures, so most users download them from the Internet and install them additionally in order to use them later in their creative work. In this article, we will tell you how to properly install the downloaded textures.

Necessary
Adobe photoshop
Instructions
Step 1
Unzip the texture archive that you downloaded from the Internet, and then copy the texture files to the Presets add-on folder in the Adobe Photoshop directory in Program Files.
Step 2
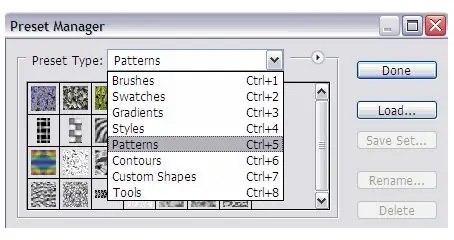
Open the Edit menu and select Preset Manager. A menu for managing add-ons will open, among which you can find styles, brushes, gradients, and textures in the list. Select Patterns from the list of add-ons and click the Load button to the right of the texture window. An explorer will open, in which you need to specify the folder in which the file with the desired texture is stored. Select the required file and click "Upload".
Step 3
After loading, click Done, and then check if the new textures appear in the preview window in the Preset Manager menu.
Then test each texture to see if it works by applying it to a font or image.
Step 4
If the texture does not load, it may be in a JPEG image format that is not suitable for Photoshop add-ons. For the program to define the file as a texture, open the desired.jpg"


