A disk image is a file that contains a copy of all data on a medium, such as a hard disk, DVD, or CD. With a disk image mounted on a virtual disk, you can work as with a regular "material" media. To create a disk image from an.iso,.mds, or.mdf file, there are several steps you need to take.

Instructions
Step 1
Install from a disk or download from the Internet a CD / DVD emulator program (Alcohol 120%, Daemon Tools or similar). Follow the installation instructions to install the software on your computer. Then start the emulator.
Step 2
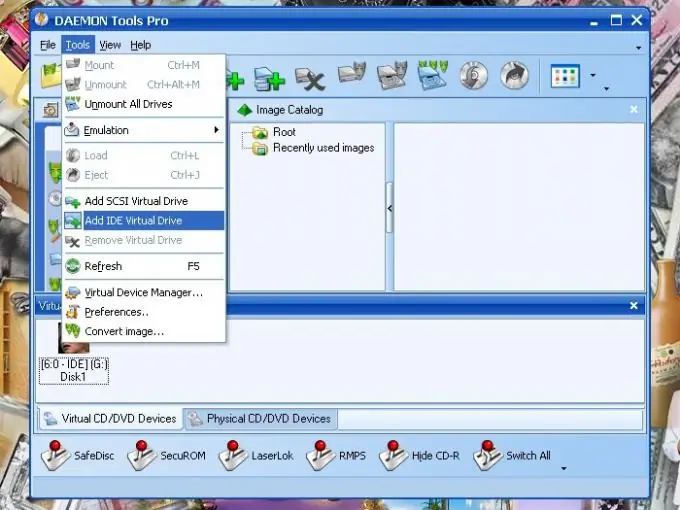
On the top menu bar, select Add IDE Virtual Drive from the available Tools. This is necessary so that a new virtual drive is created on your computer, on which you will then mount the disk image that you want to run.
Step 3
Wait while the program creates a virtual disk. Once the operation is complete, a new icon will appear labeled Empty. The drive name will be assigned based on how many drives you already have on your computer. For example, if you have one floppy drive (A), local drive (C), and DVD drive (D), then the new virtual drive will have an E ID.
Step 4
Click on the new drive icon with the right mouse button and select the “Mount Image” command from the drop-down menu or double-click on it with the left mouse button. You can also select this command from the list on the taskbar or from the Tools menu, depending on the interface of the program you are using.
Step 5
Once the new Open dialog box opens, navigate to the directory where you saved your.iso disk image (.mds or.mdf). Wait while the disk image is mounted to the virtual disk. After that, the emulator program can be closed.
Step 6
Using the "My Computer" component, open the newly created virtual drive with the disk image mounted on it and work with it as with a regular CD or DVD: install the applications you need, or view the data.
Step 7
You can also delete such a disk, or mount an image of another disk on it using the emulator. Run the program and repeat all the steps described above for a new disk image. To remove a virtual drive, select the Remove Virtual Drive command.


