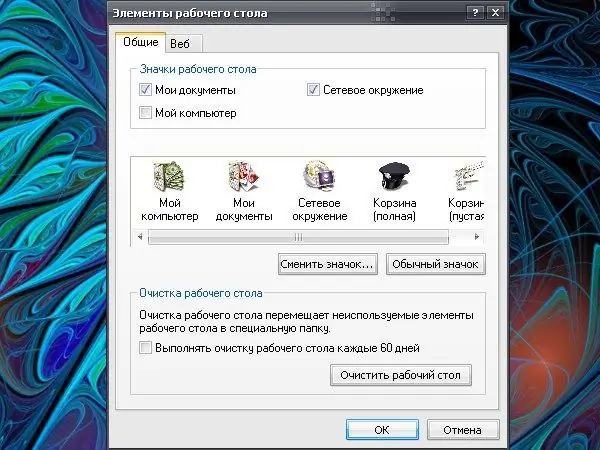
The "Desktop" contains elements that make it easier for the user to access computer resources. Almost all of them are presented in the form of shortcuts, while the resources themselves are located on local disks. It is impossible to delete shortcuts directly in the "My Computer" section (folder), since they are simply not created there. The system prohibits this action. But removing the shortcut "My Computer" from the "Desktop" is quite possible.

Instructions
Step 1
There are several ways to remove the My Computer shortcut. Move the cursor to the "My Computer" icon and click the right mouse button. In the drop-down menu, select the "Delete" command. Alternatively, select the icon with your mouse and press the Delete key on your keyboard. When asked by the system "Do you really want to remove the" My Computer "icon from the" Desktop "?" answer in the affirmative. The shortcut will be removed.
Step 2
Another way involves calling the "Screen" component. With its help, you can both remove the shortcut "My Computer" from the "Desktop", and return it to its original place. You can also call it in several ways. Click in any place of the "Desktop" free of files and folders with the right mouse button, in the drop-down menu select "Properties" by clicking on it with the left mouse button.
Step 3
Alternatively, open the Control Panel from the Start menu. In the "Appearance and Themes" category, click on the "Screen" icon or select any of the tasks at the top of the window. If your "Control Panel" has a classic look, select the "Display" icon right away. To switch from one view of the "Control Panel" to another, use the appropriate label on the left side of the window.
Step 4
In the "Display Properties" dialog box that opens, go to the "Desktop" tab. At the bottom of the window, click on the "Desktop Settings" button. In the additional window "Desktop Elements" that opens, open the "General" tab. Remove the marker from the field opposite the item "My Computer".
Step 5
Sequentially click on the OK button in the "Desktop Elements" window, the "Apply" button in the "Properties: Display" window for the new settings to take effect. Close the window by clicking the OK button or the [x] icon in the upper right corner of the window. To return the shortcut to "My Computer", follow the same steps, reinstalling the previously removed marker, and apply the settings.


