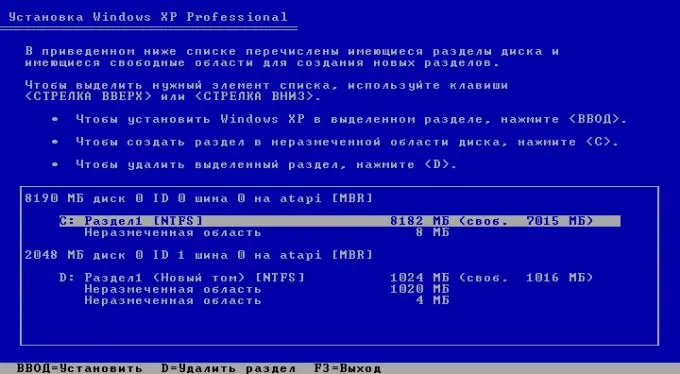
The evolution of operating systems has made them incredibly convenient and easy to use. The concept of simplicity permeates all aspects of modern operating systems, from the very installation process. So, to install Windows XP, you need to do just a few simple steps and answer the wizard's requests by entering the necessary parameters. However, even now, many users have difficulty installing Windows on their own. For example, they are faced with the question of how to partition the hard drive during installation.

It is necessary
Windows distribution disk. HDD
Instructions
Step 1
Select the physical disk where the operating system will be installed. If your computer devices include multiple hard drives, decide which one will be used to host the operating system. Discs can vary in size. Also, disks can contain data partitions. Make sure the selected disc is suitable for the size and does not contain important data that will be lost if you divide the disc further.
Step 2
Delete all partitions on the selected drive. If there are already created partitions on the hard disk, then partitioning it in the desired way is possible only by deleting and creating partitions. Highlight one of the hard disk partitions. Press the D key. The partition deletion warning appears. Hit Enter. Information about the partition to be deleted and a prompt to delete is displayed. Press the L key. Do the same with the other partitions of the hard disk set aside for the installation of the operating system.
Step 3
Plan your disk partitioning. Think about how many sections you will split it and how large they will be. As a rule, partitioning the hard disk into 2-3 parts is considered optimal. Pay special attention to the choice of the size of the system partition. There must be enough space on the system partition for the initial installation of the operating system and the location of the swap file, as well as space for creating restore points and installing application software (if you plan to install applications to this partition). So, a 250 GB hard drive can be divided into 2 parts, allocating 40 gigabytes for the system partition, and the rest of the space for a partition for storing data. In this case, it is assumed that the application programs will be installed in the Program Files folder located on the system partition.
Step 4
Partition the hard disk according to the partitioning plan you have developed. Select the line labeled "Unallocated area" in the section related to the partition to be partitioned. Press C. In the "Create Partition (MB):" field, enter the size of the partition to be created in megabytes. If you chose the size of the partitions in gigabytes, simply convert them to megabytes, multiplying the value in gigabytes by 1024. Press Enter. Select the line labeled "Unaligned area" again and do the same to create the rest of the sections.
Step 5
Finish partitioning the disk. Select the partition where the operating system will be installed. Press Enter, select the type of file system that will be created by formatting, and continue with the installation.


