Adobe Photoshop is primarily designed for working with images. But in addition to tools that allow you to make inscriptions "by hand" (brush, pencil), it also has very advanced tools for creating and various transformations of texts.

It is necessary
Graphic editor Adobe Photoshop
Instructions
Step 1
Create a new document in which the text box will be placed. To do this, just press the CTRL + N key combination. In the creation dialog, specify the dimensions sufficient to accommodate the intended text.
Step 2
Fill the only layer with any color so that the created text is better visible on its background - press the G key and click the empty picture with the mouse.
Step 3
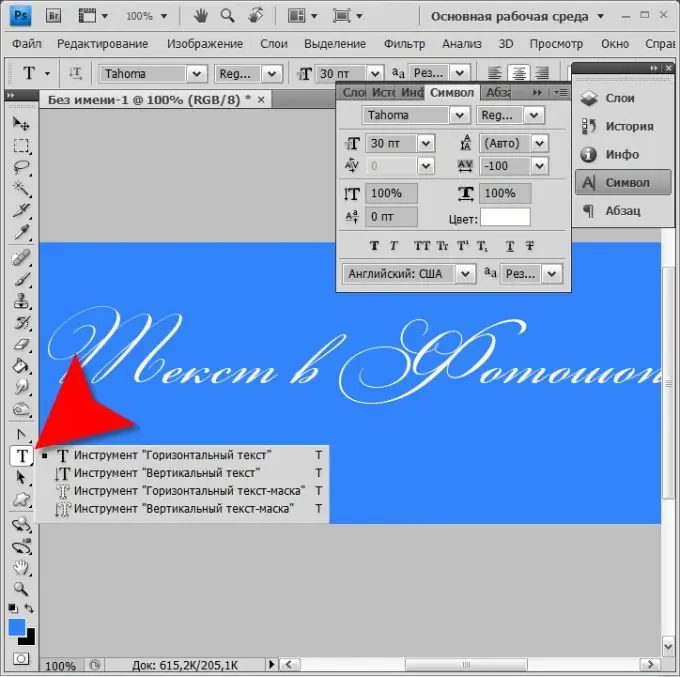
Click and hold for a second the T icon on the toolbar. With a normal click, this icon turns on the tool for creating text labels, and with a longer hold of the left mouse button, access to a selection of several varieties of this tool opens. "Horizontal text" is the most common option, you can write it in the same way as in a simple text editor. With this tool selected, click anywhere on the document and start typing. In this case, Photoshop will create a separate text layer. "Vertical text" is similar to the previous one, but after each letter the editor makes the transition for you to the next line, ie. the letters are placed one under the other. "Horizontal text mask" works differently. This tool also allows you to type horizontal texts, but the text layer is not created, but curly areas are selected along the contour of the letters, words and lines that you are typing. When the label is ready, you can click on any existing image layer and cut your text on it by simply pressing the Delete key. Or, on the contrary, invert the selection and cut out everything from the picture, leaving only the inscription you typed. There are tons of other ways to use this tool.
Step 4
Click the document and type some text. After that, click the first icon on the toolbar ("Move" tool) to turn off the text input mode.
Step 5
Open the "Window" section in the menu and select the "Symbol" item to change the parameters of the inscription made. The very first (top left) drop-down list on the settings panel allows you to change the font of the inscription (typeface) to one of the ones installed on your computer. To the right of it is a font selector - standard, italic, bold, and a combination of these three. In the second line on the left - a field for selecting (or manually entering) the font size (point size), to the right of it - setting the line spacing (leading). The third line contains two controls for the distance between letters (kerning and tracking). On the line below, you can specify the proportions of compression of standard letter sizes separately vertically and horizontally. Even lower, you can set the amount of shift of the selected letters or words relative to the rest of the text vertically (offset of the baseline). By clicking the rectangle with the inscription "Color", you can open the dialog for choosing a shade for the inscription made as a whole or only for the selected letters.
Step 6
At the bottom of the panel there are pictograms that allow you to make the letters of the inscription bold, italic, capitalized, capitalized while maintaining the sizes of capitals (small capitals), superscript, subscript, underlined, strikethrough. Here they are listed in order from left to right. At the very bottom line, the list on the left allows you to select the language for hyphenation, and on the right, the font smoothing method.
Step 7
Save your document in Photoshop format when you're done formatting the text. This can be done by pressing CTRL + S.


