The first thing that catches your eye right after the transition from Windows XP to newer versions is the size of the icons on the desktop. It is very easy to restore the usual appearance, there are several ways to resize shortcuts in any version of this operating system.

Instructions
Step 1
If you are using Windows Vista or Windows 7, then resizing your desktop icons is extremely easy. Click the background image first to make sure the system's focus is on the desktop and not on the program window you were working in before (for example, the browser window).
Step 2
Press the CTRL key and rotate the mouse wheel while holding down the keys. Rotating the wheel away from you will increase the size of the shortcuts on the desktop, and rotating it in the opposite direction will decrease.
Step 3
There is another way to resize icons. If you right-click a space on your desktop that is free of open programs and shortcuts, a "context menu" will appear (the right-click menu is always called "context menu"). The topmost line in it ("View") has a subsection, which, among other desktop settings, contains three options for icon sizes - large, regular and small. Choose the one that suits you best.
Step 4
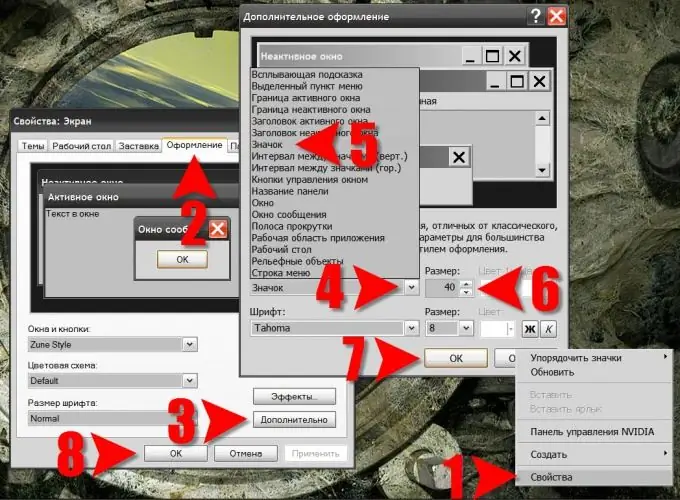
If you are using Windows XP, you will have to do a lot more manipulation to resize the shortcuts. Start by right-clicking on a space on your desktop that is free of shortcuts and windows. In the context menu, you need to select the lowest item ("Properties") in order to access changing the screen settings.
Step 5
Go to the "Appearance" tab, find the "Advanced" button in the lower right corner and click it.
Step 6
Open the drop-down list under the "Element" caption in the opened window with the "Additional design" heading and select the "Icon" item in it. Then, by changing the numbers in the box below "Size", set the width and height of the labels in pixels. On the next line in this window, you can change the typeface of the font used in the signature under the label and its size.
Step 7
Click the "OK" buttons in both open windows ("Additional Appearance" and "Properties: Display") to commit the changes made.


