When creating documents, sometimes you need to enter vertically oriented text. There are several possibilities for this in the MS Word text editor.

Instructions
Step 1
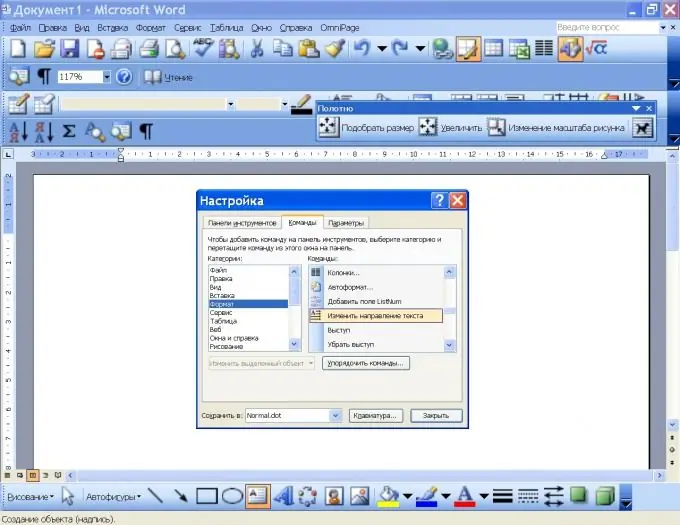
Place the cursor in the document where you want to place vertical text. If you are using a version of Word 2003, on the Insert menu, click Text Box. The "Canvas" property panel appears along with the frame of the future text. Click on the down arrow at its right edge and select "Customize" from the "Add or Remove Buttons" list.

Step 2
In the settings window go to the "Commands" tab. In the Categories section, check Format and in the Commands section, find Reverse Text Direction. Click the icon with the mouse and drag it to the taskbar.
Enter text within the frame and click the Flip Text Direction button. Your text box will rotate 90 degrees. In later versions of Word, the Text Rotation button is on the toolbar on the Insert menu to the right of the Header and Footer group.

Step 3
After you have brought the button to the taskbar, you can use another command. Enter text and select it with the mouse. On the Format menu, click Add Text Box. The text orientation button becomes active. Click it to select the desired direction.
Step 4
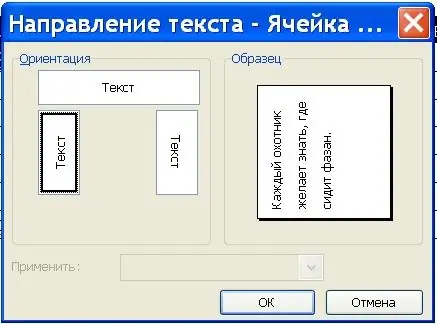
There is one more way. Place the cursor where you want the vertical text to be. From the Insert menu, click Tables and Insert Table. Specify 1 column and 1 row and enter text. Then select the resulting cell with the mouse and right-click. In the context menu, select the "Text direction" item and in the "Orientation" section, specify the desired direction.

Step 5
To make the borders of the table invisible, right-click on the cell and select "Table Properties". In the "Table" tab, click "Borders and Fill" and mark the type of table without borders - the one next to which is written "None".
Step 6
If you want the letters to be oriented traditionally, but located one below the other, when creating the table, specify 1 column and 1 row. In the AutoFit Column Width section, select Constant. Enter the first letter of the sentence in the cell, right-click and select Fixed Column Width from the AutoFit list.
Step 7
Move the cursor over the right border of the cell until it looks like arrows pointing in opposite directions. Hook the border with the mouse and drag it to the left so that the width of the cell is equal to one letter. As you enter the rest of the letters, they will automatically wrap to a new line. Make the borders of the table invisible, as in step 5.


