As a modern saying goes, a girl's best friend is Adobe Photoshop. Indeed, most of the fantasies about their appearance can now be easily realized by anyone who has at least a little knowledge of the magical tools of this program.

Instructions
Step 1
There are many ways to change eye color in Adobe Photoshop. We will consider one of them in this tutorial.
Open the photo file.
Step 2
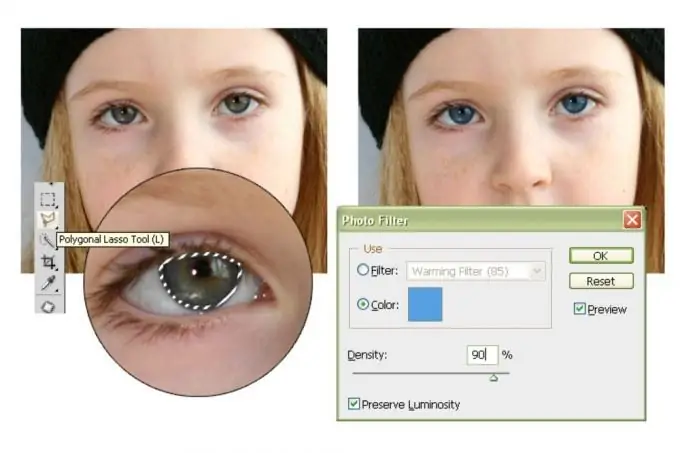
First, you need to designate those areas that need to be repainted. To do this, use the Polygonal Lasso tool. Having set the scale of the image so that it is easy to see the contours of the iris of the eyes, we begin to trace them - we draw a broken curve around the selected zone. The smaller the segments of this broken line, the more accurately we can approach the real contour of the photographed eye, but we should not be too small either. If you accidentally put the vertex of the segment in the wrong place, pressing the "Backspace" key can save the situation, canceling the last action in the construction of the contour.
When the end of the curve coincides with the beginning, the selection area closes, and a flickering dotted line begins to run along the contour. The selection is complete. In principle, the preparatory stage is over and you can proceed to the repainting procedure, but, as a rule, both eyes are visible in the photo and it is necessary to change the color of both in the same way, unless, of course, you are trying to achieve some special fantastic effect.
To add another area to the selection area - the contour of the second eye - we do a simple action: press the Shift key, while the Lasso tool icon slightly changes its appearance, a plus sign appears in it. And while holding this key, we begin to build the second polyline in the area of the second eye. After the very first click - setting the first vertex - the Shift key can already be released. Finish tracing the contour of the second eye, as we did with the first. The area selected in this way will be added to the result of the previous operation.
Step 3
So, we have selected both eyes - contours flicker around the iris of each of them. Now let's start changing the color. In the arsenal of the Photoshop program there are many tools that allow you to do this. Let's use the Photo Filter tool (you can find it in the Image> Adjustments> Photo Filter menu). In the window of its settings, you can see two parameters that we need: this is, firstly, a square, with which we can set the required color. And secondly, this is the engine responsible for the depth of the effect on the images. Switching the color selection to manual mode, double-clicking on the color square field, set the color tone we need. After that, visually controlling the resulting image, we adjust the density of the effect.
Setting the slider to 100% will most likely be fraught with an unnatural, overly monotonous iris color. In reality, in a living person, it has a fairly wide range of colors that deviate from the basic color tone - and “combing all of them with the same brush” is not worth it. A value of 75-85 %% is usually enough to give the eye color a distinct tint without making the photo look fake.

Step 4
To keep the flickering outlines out of your way, deselect with Ctrl + D. If you don't like something, you can undo the last few operations through the Edit> Step Backward menu, and re-do the necessary procedures, making reasonable adjustments.
Step 5
If you are satisfied with the result, save the image via the File> Save As menu command, specifying a new name and storage location for the resulting photo.


