Modern Internet resources offer many convenient and simple ways to publish images. As a rule, such resources allow users to view not only the snapshot itself, but also additional text information called the header of the EXIF file (Exchangeble image format). It is in EXIF that data about the shooting time (DateTime Original) is contained. You can programmatically change the date when a digital photo was taken. Let's see how to do this using Picasa, a free photo program from Google.

Necessary
If Picasa is not installed on your computer, download it from
Instructions
Step 1
Launch Picasa. The left pane displays the scanned folders containing graphic files. In the right pane, thumbnails of images are displayed. If the folder with the desired photo is displayed in the left panel, then STEP 2 of this instruction can be skipped.
Step 2
If the folder does not appear in the left pane, you need to add it to Picasa's scanned list. Open the File menu, select Add Folder to Picasa. The "Folder Manager" window will open. Select the folder you want to add from the list. On the right side of the window, select Always Scan or Scan Once. Click the OK button. All photos from the selected folder will be scanned and displayed in Picasa.
Step 3
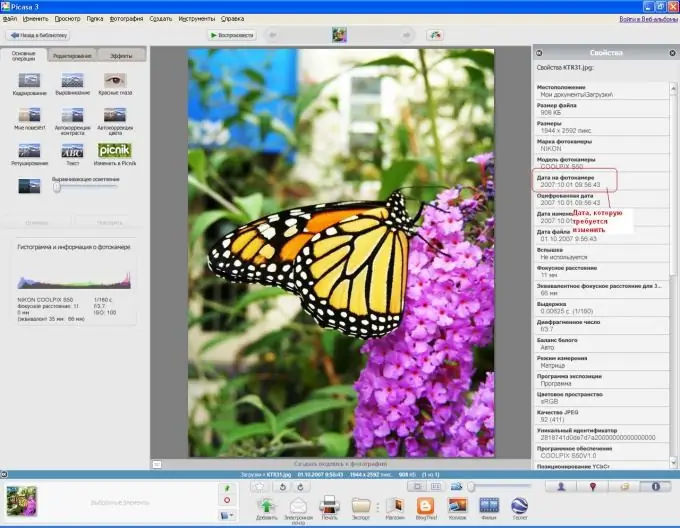
Double-click the left mouse button to select a photo. In order to view its EXIF data, open the "Photo" menu, select the "Properties" item. The parameter table is displayed on the right.

Step 4
To record a new date, open the "Tools" menu, select the "Set date and time" item. In the "Change Photo Date" window, use the "Calendar" drop-down component to change the date using the arrow or cursor keys. Also, the date and time can be changed manually by placing the cursor in the input field.
Step 5
Click the "OK" button and save the changes. To do this, open the "File" menu, select "Save As" or "Save a Copy" (in this case, Picasa will save your photo with a new date in the same folder, and the version number will automatically be appended to the file name).


