Microsoft ClearType technology is a special font anti-aliasing technique that makes character recognition easier. Its use somewhat reduces fatigue when working with on-screen texts and increases the speed of reading them. Research has shown that enabling ClearType saves about 5% of your work time. The technology started with Windows XP, and Windows Vista and Windows 7 even added fonts to take full advantage of the technology.

Instructions
Step 1
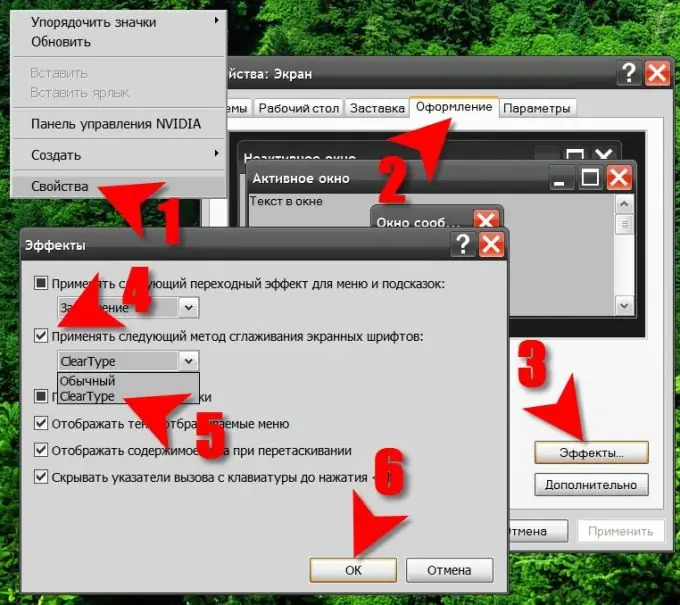
If you are using Windows XP, start the procedure for enabling the system to use ClearType technology by right-clicking on a shortcut-free space on your desktop. In the context menu that you will call this action, select the very bottom line - "Properties". This is a short way to the component for changing the display settings, but there is also a longer one - through the OS control panel. It needs to be started by selecting the appropriate item in the "Settings" section on the "Start" button in the menu. In Control Panel, click the Appearance and Themes link and then the Display link.
Step 2
Go to the Appearance tab and click the Effects button. The window that opens will be the last on the way to the desired OS setting.
Step 3
Check the box next to "Use the following anti-aliasing method for screen fonts." Then expand the drop-down list on the next line and select ClearType.
Step 4
Sequentially click the "OK" buttons in the "Effects" and "Properties: Display" windows to commit the changes made to the font display settings.
Step 5
If you are using Windows 7 or Windows Vista, this technology is enabled on your system by default. If it was disabled by the user, then to re-enable it, open the main menu on the "Start" button and type ClearType in the "Find programs and files" field. In the list of search results, select the "Customize ClearType Text" line. This launches a control panel component named "ClearType Text Customizer".
Step 6
Check the "Enable ClearType" checkbox and click the "Next" button to go to the dialog for visual configuration of font display options.
Step 7
Click Next when the setup wizard informs you that the monitor is set to a base resolution.
Step 8
Choose from the suggested samples the best way to display the text in the next four dialog boxes. Confirm your choice by clicking the "Next" button.
Step 9
Close the ClearType Tuning Wizard by clicking Finish.


