You have brought from your vacation a lot of pleasant impressions and just as many short videos. Naturally, it's much more convenient to glue these videos into one file and show them all at once, rather than asking your friends to wait until you find the next file. Any video editor will perfectly cope with the task of gluing several avi files, including those that come with cameras.

Necessary
- - MotionDV Studio software;
- - avi files.
Instructions
Step 1
Prepare avi files for processing. To do this, collect them into one folder.
Step 2
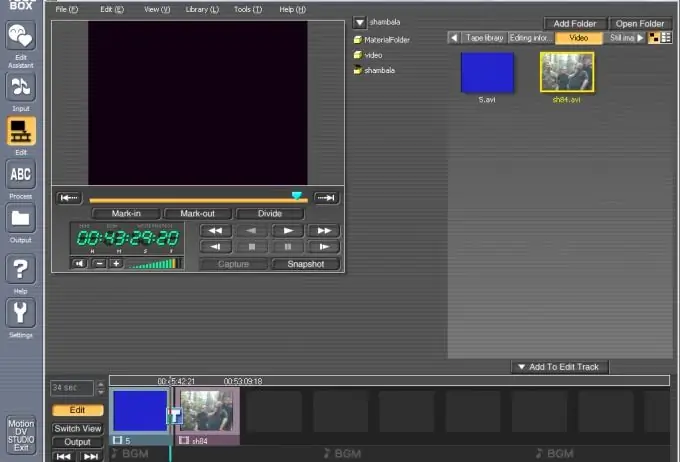
Load the files you are going to merge into the video editor. To do this, left-click on the Add Folder button located in the upper right part of the program window. In the Create new folder window that appears, click on the folder icon on the right side of the window. In the explorer window select the folder where your avis are saved and click on the OK button.
Step 3
Add the files to be glued to the timeline. To do this, click on the Switch view button located at the bottom of the video editor window to the left of the timeline. Now each of the glued avis will be displayed as a single icon on the timeline. Use the mouse to drag the files onto the timeline. You can do it easier: left-click on the first file, press the Shift key and click on the last file. Left-click on the Add to edit track button, which is located above the timeline at the bottom of the program window.
Step 4
Insert a transition between files if you see fit. To do this, right-click on the icon with the letter "T" that appears at the junction of your two avi files. Select the Add transition command. In the window that opens, select the transition by clicking the left mouse button on its icon. By pulling the slider below the Preview window, you can see how the walk between your two videos will look like. By dragging the Transition time slider, you can lengthen or shorten the duration of the transition. Click OK.
Step 5
Save the video to your computer's hard drive. To do this, place the cursor on the Output button in the left part of the program window. In the menu that appears, select File output. In the saved file settings window that opens, specify the name of this file in the File name field. Select the format you want from the Format drop-down list. By default, the video will be saved in the same folder where the source files are. Click on the File output button and wait until the file is saved.


