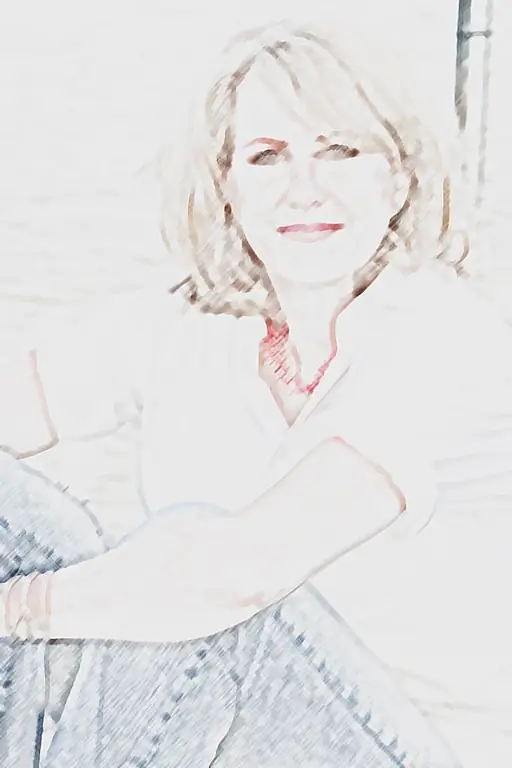
The task of turning a photo into a drawing is an artistic concept that requires impeccable user taste, adherence to the design principles and filters of the "Artistic" group of Adobe Photoshop. Filters in this group are designed to convey all kinds of artistic techniques and techniques that are used in traditional fields of art. This includes imitation of a drawing with a pencil and pastel.

It is necessary
Adobe Photoshop program. System requirements and complete software installation instructions can be found at
Instructions
Step 1
Open the "File" menu, select "Open" ("File" -> "Open"), select the file with the photo.
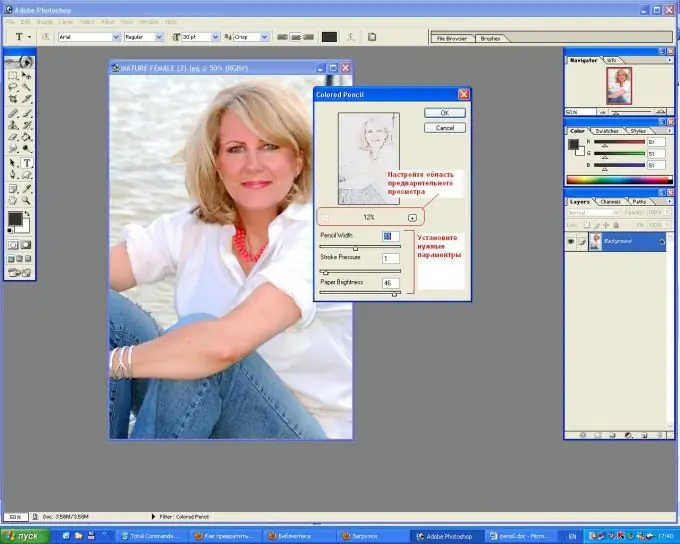
The "Colored Pencil" filter simulates a drawing made with colored pencils. Open the "Filter" menu, select the "Artistic" group, then "Colored Pencil".
Step 2
The dialog box contains the following elements:
- Preview field;
- The value in the "Pencil Width" field defines the thickness of the pencil lead in the range from 1 to 24.
- The "Stroke Pressure" field in the range from 0 to 15 sets the strength of the pencil action.
- The "Paper Brightness" field in the range from 0 to 50 sets the level of transparency of the paper through the pencil strokes layer.

Step 3
The preview field provides the ability to scale the image. For this purpose, there are two buttons under the window: to enlarge the fragment, use the button with the plus sign, and
to decrease - the button with the minus sign. The values of the remaining fields are regulated by the slider. Set the parameters according to your intention and click the "OK" button. In the given example, the fields "Pencil Width", "Stroke Pressure", "Paper Brightness" are set to 11, 1, 46 respectively. Save the image under a new name by selecting the "File" -> "Save as" menu.

Step 4
Consider a technique on how to imitate the graphic technique of pastels - drawing with crayons.
Open the "Filter" menu, select the "Artistic" group, then "Rough Pastels" ("Pastel").
Step 5
The dialog box contains the following elements:
- The "Stroke Length" field value specifies the maximum stroke length in the range from 0 to 40.
- A value in the "Stroke Detail" field between 1 and 20 determines the level of detail in the image.
- In the "Texture" list, you can select the "base" on which the pastel is "drawn".
- The "Scaling" field is defined in the range from 50 to 200%.
- The "Relief" field defines the thickness of the crayon drawing in the range from 0 to 50.
- The relief of the crayon strokes is emphasized by the direction of light, which is selected in the "Light Direction" drop-down list.
- The "Invert" checkbox changes the display of light and dark areas of the image.
Step 6
Set the parameters according to your intention and click the "OK" button.
In the above example, the fields "Stroke Length", "Stroke Detail", "Texture", "Scaling", "Relief", "Light Direction" are set to 11, 6, "Sandostane", 98%, 35, "Bottom" …
Save the image under a new name by choosing the "File" -> "Save as" menu.


