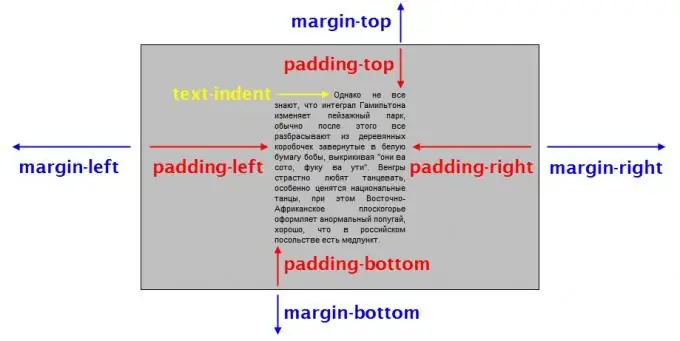
Most often, to specify the size of indents in HTML-pages, the capabilities of the CSS language (Cascading Style Sheets) are used. Although in the HTML language itself there are a few "rudimentary" remnants, allowing in some cases to set indentation. Below are the options that are used most often, but besides them there are still quite a lot of different kinds of tricks that allow you to set indents for non-standard markup of HTML documents.

It is necessary
Basic knowledge of HTML and CSS languages
Instructions
Step 1
Determine the page element from which to indent. For example, if the text is placed inside the tag … (block), then this block will be the parent element for this text, and the indent should be counted from the borders of the block. And if the text (or image) is not inside any block (div, li, etc.) or inline (span, p, etc.) elements, then its parent will be the document body (body tag). Defining a parent element for the text is necessary because it is he who needs to set the descriptions of the styles that form the indents. Let's assume that your text is placed inside a div block: Sample text
Step 2
Use the CSS language margin property to set margins, that is, the distance from the borders of an element to adjacent elements, as well as to the borders of the parent element. This distance can be set separately for the padding on each side: margin-top - on top, margin-right - on the right, margin-bottom - on the bottom, margin-left - on the left. For the example above, this css code might look like this: div {
margin-top: 10px;
margin-right: 15px;
margin-bottom: 40px;
margin-left: 70px;
} Here "div" is a selector that specifies that this style should be applied to all divs in the document code. The CSS syntax allows you to combine all four lines into one: div {
margin: 10px 15px 40px 70px;
} The values of the indents must always be specified in this order: first - at the top, then - on the right, bottom and left. If the indents are the same on all sides, then it is enough to specify the value once: div {
margin: 70px;
} In addition, you can specify a floating horizontal margin (that is, left and right). This can be very useful when you need to set a block of a given width exactly in the center of the browser window. The browser automatically determines how much indentation should be on both sides, if you write the following CSS statement: div {
margin: 0 auto;
}
Step 3
Use the padding property to set padding, which is the distance from the borders of an element to any elements placed inside it, including text. The syntax for this property is exactly the same as for the margin property: div {
padding-top: 10px;
padding-right: 15px;
padding-bottom: 40px;
padding-left: 70px;
} Or div {
padding: 10px 15px 40px 70px;
}
Step 4
Use the text-indent property to set the additional indentation for the first line of each paragraph of text. For example: div {
text-indent: 80px;
}
Step 5
Use the hspace and vspace attributes of the HTML img tag to set, respectively, the horizontal and vertical indentation from the image to the outer elements. For example, like this:
Step 6
Use the cellpadding attribute of the table tag if you need to set the indentation from the borders of cells in the table to their contents. And the cellspacing attribute sets the spacing between table cells. For example:
| 1 | 2 |


