Adobe Photoshop is a powerful graphics processing machine. But it often happens that inexperienced users spoil their pictures and can no longer return them to their original state. The reason for such failures lies in ignorance of the basic rules of Photoshop. First and foremost, never work immediately after opening a document in this program. You should always start by making a copy of the "background" layer. After all, creating a new layer is the basis for work. And here's how to do it, read below.

Instructions
Step 1
You can create a new layer only if you have a document open. There are several ways to create a layer. The first one. In the main menu, select the "Layers" - "New" - "Layer" tab. A window will appear. In it, you can enter the name of the layer to be created, define its color and select the overlap mode, if necessary. Click "Ok". The layer is ready.

Step 2
Second way. On the right side of the workspace, you will find a panel for working with layers. In its upper right corner there is an icon in the form of a small arrow and several stripes. Click on it to bring up a menu. In it, select "New Layer" and you will see the same window as in the first step.
Step 3
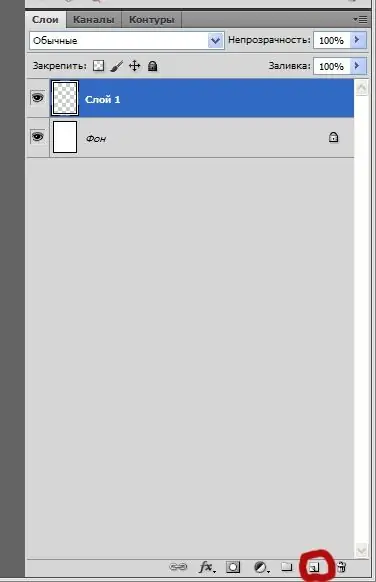
Third way. At the very bottom of the layer toolbar, there are several small buttons. Select the folded sheet of paper icon. Click it and a new layer will appear immediately. There will be no layer creation window. The parameters will be set automatically: transparent background, normal blending mode, the name "layer1, 2, 3" or another number in order.

Step 4
And the last, fourth method is perhaps the fastest. Press the Shift + Ctrl + N keyboard shortcut. The window for creating a layer will appear again. Select the options you want and click "OK". These four options are all about creating a clean layer.
Step 5
However, there is often a need to create a layer with filling. Let's say you opened a photo. It will automatically position itself on the "background" layer. To work, you need to create a copy of this layer. To do this, simply drag the original layer onto the icon that we talked about in step 3. A new layer will appear with the name "background copy"
Step 6
Another way to create a new copy layer. Right-click on the "background" layer and select "duplicate layer" from the drop-down menu. A window will appear in which you can enter the name of the layer and the place where the copy will be placed (this document or you need to create a new one). Assign whatever you need and click "OK". The layer appears and is ready to go.


