The Pilot program is designed for comfortable playing in Lineage, it creates shortcut buttons in the game client, gives you the ability to control the game, which allows you to spend less time on the same commands.

Necessary
- - a computer connected to the Internet;
- - client of the game Lineage.
Instructions
Step 1
Download the latest client to configure the pilot. You can download it, for example, on the website www.l2control.com under Soft. Unpack the archive into one folder and run the Cserv.exe file to activate the CServer server
Step 2
Set the port for the game server or enable Inject mode, restart the program. You can set the value of the standard port - 777. Load the program configuration from the default.ini file (located in the program folder) at the time of the first launch of the program to make the initial pilot settings for L2.
Step 3
Run the program before starting the Lineage II game client itself. If you play on free servers, then the program can be launched until the server is selected. To configure the pilot for Lineage II on Windows 7, Windows Vista, right-click on the CSERV. EXE file and select Properties. Go to the Compatibility tab, check the box next to Run this program in compatibility mode and select the Windows XP SP3 operating system.
Step 4
Go to the program parameters, where the login (name) of your character with CP, HP, MP indicators is displayed. Set the hot button to set the AutoCP ("autopilot") mode. By default, this button is ScollLock.
Step 5
Select the "Beep" option to set the soundtrack to enable and disable the Autopilot mode. While working in the "Autopilot" mode, the program is able to emulate keystrokes Alt + 1 -0; "-"; "="; F1-F12; Alt + NUM1-NUM0 according to the conditions that must be set in the table. If you enable Packet mode, you will be able to use things directly from the character's inventory.
Step 6
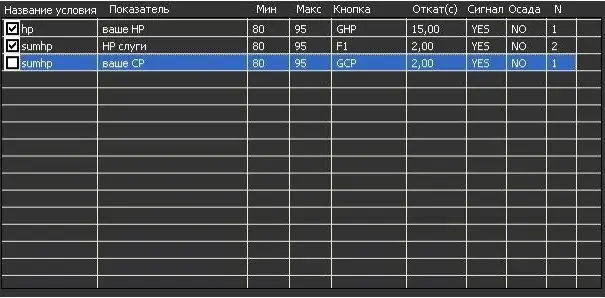
Fill in the table to indicate what actions the program should perform in the "Autopilot" mode. The field "Condition name" is filled in arbitrarily; in the "Indicator" field, specify the required one, for example, НР; in the “Minimum value” field, set the value for which the “Min” action of the button will be performed, if the indicator is less; in the "Maximum value" option - vice versa.
Step 7
In the Button field, specify the button to click on the client. "Rollback" field - sets the time elapsed between clicks. After you've added a measure to your spreadsheet, check the box next to it to enable it. Save your changes. Pilot setup for L2 is complete.


