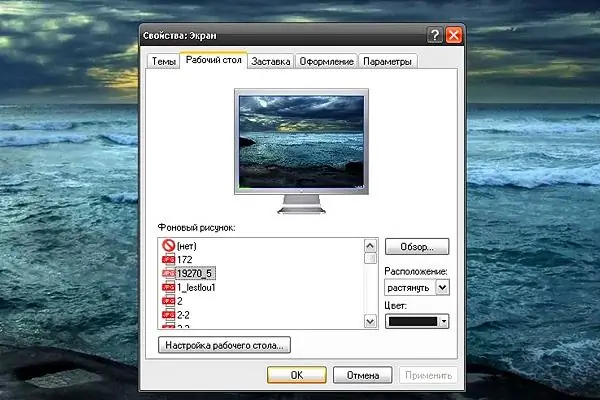
The desktop is the area that appears in front of you after turning on the computer and loading the operating system. This is where your work begins with all the files and folders on your computer. For one reason or another, your desktop settings may go awry. You can fix the desktop, its entire appearance, in a couple of minutes.

Instructions
Step 1
All work on fixing the appearance of the desktop will take place in the "Properties: Display" window. It is not difficult to bring up this window. Click on the desktop area free of folders and files with the right mouse button and select the "Properties" line in the pop-up menu that appears (it comes last in the list of commands). Click on it with any mouse button.
Step 2
Adjust the screen resolution. The appearance of the desktop, the size of icons and fonts, the effect of the proximity or distance of objects on the monitor screen depends on it as a whole. To do this, go to the "Parameters" tab (extreme on the right side) by clicking on it with the left mouse button. Use the "slider" in the "Screen Resolution" section to set the resolution that is comfortable for your perception.
Step 3
The Appearance tab is responsible for the color of the Start menu bar and the color scheme of the folders. Using the lines of the drop-down menu, choose a color scheme that is comfortable for the eye. At the top of the window, you will see how the new skin will look. Adjust the shadow effect using the Effects button. You can work out in more detail and customize the appearance of the windows using the "Advanced" button. Set a readable font size.
Step 4
The Screensaver tab controls how your desktop will look when paused (that is, when the computer is turned on, but you are not using a mouse or keyboard input). If the splash screen is set to (No), after a certain time the screen will simply turn off; if a different value is selected, the animated theme will be used. You can set the number of minutes after which the screen saver will appear on the screen in the "Interval" field.
Step 5
The "Desktop" tab is responsible for the desktop theme, that is, the picture that you have set as the background. You can select it from the list in the "Wallpaper" section or set your own theme by specifying the path to it via the "Browse" button. If there is no such picture, the desktop will be filled with a solid background. The background color can be selected from the drop-down menu in the "Color" section. If the palette does not contain the color you need, click on the "Other" button to expand the entire palette.
Step 6
The "Theme" tab is responsible for the design of the working areas of the operating system as a whole (folders, background, window colors, appearance, font size, etc.). It is good to use it when everything suits you in a certain topic. If you want to make the theme more individual, set the "base" on this tab, and customize everything else using the other tabs to your liking. If you downloaded a theme, for example, from the Internet, you can install it using the same tab. In the drop-down menu, click on the "Browse" line and specify the path to the topic.
Step 7
To finish working with the "Properties: Display" window, click the "Apply" button (this will save the changes you made) and the "OK" button or left-click on the "X" icon in the upper right corner of the window.


