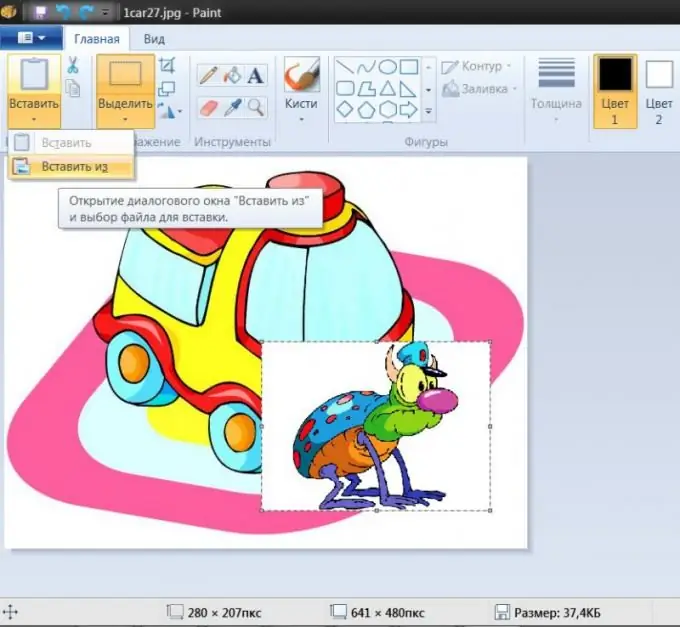
When working with pictures or photographs, the operation of overlaying one image on another is used more often than any other. The most convenient way to do this is with the help of specialized programs - graphic editors. The very procedure for combining pictures is not difficult, but depending on the application used, the sequence of actions may differ.

Instructions
Step 1
Use, for example, the standard graphics editor Paint included in the Windows software tools. Launch the application, press the key combination Ctrl + O, find and open the picture that should appear in the background as a result.
Step 2
Open the drop-down list with the inscription "Paste" in the Paint menu and select the line "Paste from" - the graphic editor will re-launch the file download dialog. Use it to find and open the second picture - Paint will place it on top of the first. You will be able to adjust the position and size of this picture - do this by moving the anchor points placed on the outline of the inserted image. This operation is possible only immediately after insertion; later it will not be possible to return the frame with anchor points.
Step 3
Save the combined image by pressing the Ctrl + S keyboard shortcut.
Step 4
If you have the opportunity to use the graphics editor Adobe Photoshop, this will significantly expand the range of options for combining two images. After launching this application, open the background image in the same way that is used in the Paint editor - the file open dialog and here is called by the Ctrl + O keyboard shortcut.
Step 5
Open the second picture in the same way. Then place it on a separate layer above the background image. If you have both pictures open in separate windows, then simply drag a line from the layers panel to another window with the mouse. You can do it differently - select the entire image (Ctrl + A), copy the selected one (Ctrl + C), go to another window and paste the copied one (Ctrl + V). The editor will automatically create a new layer for the inserted image in both cases.
Step 6
Adjust the position and size of the pasted picture - press the key combination Ctrl + T, and then proceed in the same way as in the Paint editor. If you move the anchor points while holding down the Ctrl key, then the dimensions of the inserted image will change proportionally, without distorting the ratio of width and height.
Step 7
Set the options for blending the foreground image with the background image. You can adjust its opacity using the slider that appears when you open the Opacity drop-down list in the layers panel. To the left of this control is another list, in which you can choose one of more than two dozen ways to overlay images.


