It so happens that the video card no longer meets your requirements for it. For example, you wanted to play some new game, but the video card is not able to handle it. In this case, the easiest way is to buy a new video card, but if you are not looking for easy ways, you can try to increase the performance of the old card. At the same time, remember that no one guarantees a successful outcome of this operation. If you nevertheless decided to try to improve your video card, then follow the instructions below.

Instructions
Step 1
To get started, download some useful utilities that will help you in your business, namely: Riva Tuner 2.24 (it will help us increase the power) and ATITool (which is a tester).
Step 2
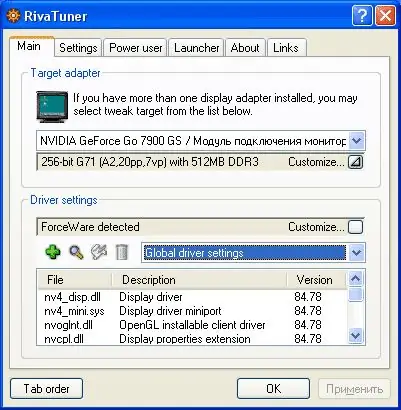
So, install Riva Tuner. Run the program. Click the Home (or Main) tab. In this tab the model of your video card should be defined.
Step 3
Now you need to launch the window with graphs. To do this, in the graph with your video card, open the drop-down menu and find the icon with a triangle there. Click on it and then select "Monitoring". This will help keep track of all changes in the state of the device. Do not close the monitoring window throughout our work.
Step 4
Return to the Riva Tuner window. Select the "Driver Setting" tab. Select your graphics card icon and then System Preferences.
Step 5
You should see a window with three tabs (Overclocking, Compatibility and Overlay). In the "Overclocking" tab, check the box next to "Enable overclocking" at the driver level. Then you will again see a window in which you will be prompted to restart your computer. In this window, check the box "Allow" for separate adjustment of 2D / 3D frequencies and click the "Definition" button.
Step 6
Go back to the System Preferences window and select 3D from the drop-down menu on the right. Now move the "Core frequency" lever to increase its value by about 60-70 MHz. Click OK.
Step 7
Now we need to test the work done. Install ATITool on your computer and run. In the window that appears in front of you, select Scan for artifacts.
Step 8
In the window that opens, you should see an image. At the bottom left there should be an inscription "No errors for …" The picture should not have any clearly visible anomalies. If you do not see the inscription, and something is clearly wrong in the picture, then it is better to refuse to upgrade your video card and buy a new one, otherwise you can simply burn it.
Step 9
If everything is in order, then open the Riva Tuner window and select "System Preferences". There, increase the core frequency even more, and then check the card again with the ATITool program. If you notice that something is wrong, go back to Riva Tuner and decrease the frequency. You must find the frequency at which your card will perform best.
Step 10
If you did everything correctly, now you, without replacing the video card, will get a much clearer and more high-quality image. Remember that you do all these operations at your own peril and risk, and no one will undertake to guarantee you that everything will go smoothly. Good luck to you!


