Enlarging a picture involves editing an image of your choice. In some cases, this may be called retouching. Image enlargement is used for printing photographs, posters, posters and banners. Typically, printing a photo on a banner requires high quality source material. If your photo does not meet such requests, then the image on the banner will be of low quality, i.e. pixels will be visible in the photo. Therefore, when choosing a photo, you must follow the following instructions.

Necessary
ACDSee Photo Manager software
Instructions
Step 1
First of all, choose a suitable photo or picture for later enlargement. It should not be too small, i.e. the resolution must be higher than 640x480 pixels. It is also worth deciding on the choice of software for performing the image enlargement operation. There are enough such products on the software market. The most convenient program, in all respects, for editing images in one click is a product from ACDSee. With the release of a new version, this program acquires more interesting and useful functions. Of course, she is still far from Photoshop, but she does the basic techniques of image processing or editing.

Step 2
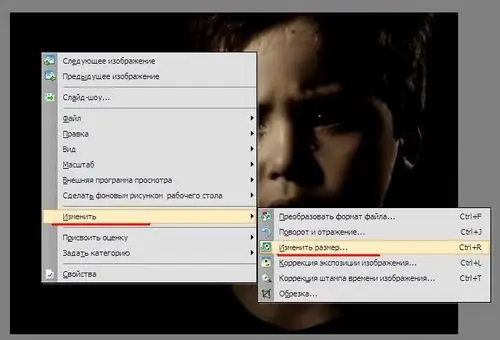
After you install this program, open your image file in it. Right-click on the picture - select "Change" from the context menu - then select "Resize" (or press the key combination Ctrl + R).

Step 3
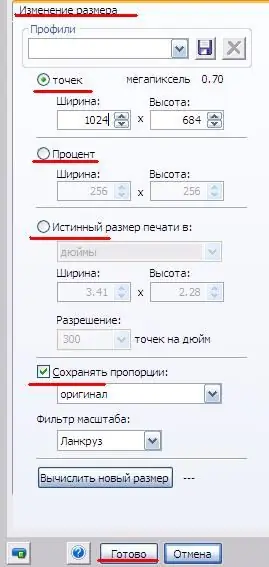
In the window that opens, you must select a method for measuring the aspect ratio:
- in points (pixels);
- in percentages;
- in millimeter equivalent (mm, cm, dm).
Most print run companies use layouts with a specified aspect ratio in pixels. Therefore, the first option will be the most profitable. Next to the highlighted item there will be 2 dimensions: width and height. Enter the value you need in one of these fields - the program will automatically adjust the second value in automatic mode. But it is possible to disable this mode at the bottom of the left panel - the "Maintain aspect ratio" item. After changing the aspect ratio of your image, click on the "Finish" button.

Step 4
Close the window or scroll with the mouse wheel - you will see a dialog box in which you need to select one of the actions:
- save;
- save as;
- do not save;
- cancellation.
If you want to save the changes not by changing the name of the file, then click "Save". To save under a different name, click "Save As". Clicking on the "Do not save" button will not change the current file.


