The Microsoft Word text editor has built-in capabilities for different ways of placing text on sheets of paper. In addition to using columns and book templates, there are also options for placing two pages next to each other in a horizontal or vertical plane.

Necessary
Microsoft Word text editor
Instructions
Step 1
Open a document in a text editor, the pages of which must be placed two on a sheet - the corresponding dialog is launched by pressing the keyboard shortcut CTRL + O.
Step 2
Go to the "Page Layout" tab and expand the drop-down list on the icon labeled "Fields" - it is placed here in the "Page Settings" section. The bottom-most item in this list is called Custom Fields - click it. In this way, a window opens with a more complete set of page parameters settings.
Step 3
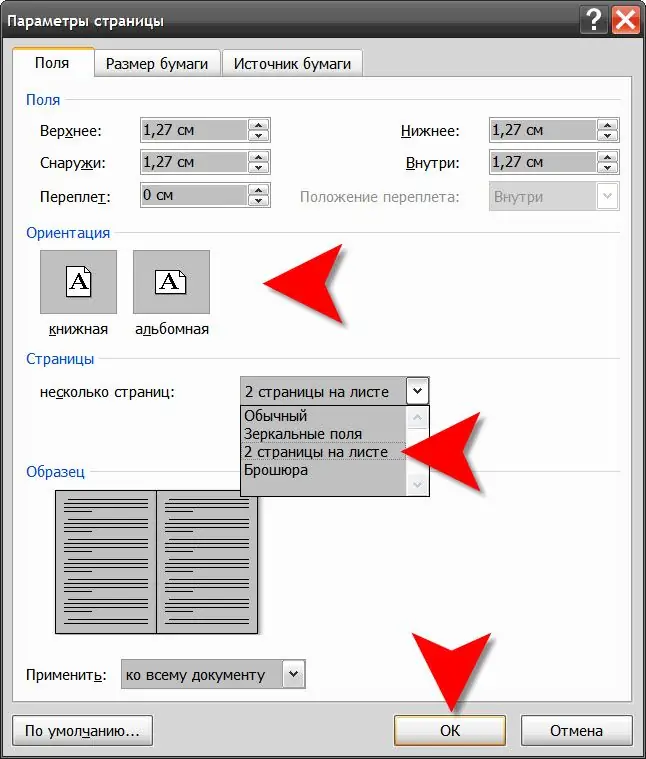
Choose how the pages will be laid on the paper. The Fields tab, which opens by default, is divided into several sections. The "Orientation" section contains two options for arranging pages on a sheet of paper - portrait and landscape (or portrait and landscape). If you need to place two pages side by side, then click the "landscape" option, if one above the other - leave "portrait".
Step 4
Find in the "Pages" section a drop-down list placed opposite the inscription "multiple pages". Expand it and select the line "two pages per sheet". In this case, in the "Margins" section, which is placed first on this tab, there will be changes in the names of the settings - set the required values of the margins from the edges of the sheet and between the pages on this sheet.
Step 5
The default setting for printing is A4. If you are going to use a different size for printing two pages on a sheet, then go to the "Paper Size" tab and select the desired size in the uppermost drop-down list.
Step 6
Click the "OK" button when all formatting settings are complete.
Step 7
In versions of this editor earlier than Microsoft Word 2007, you can access all of the listed settings by selecting Page Setup from the File menu.


