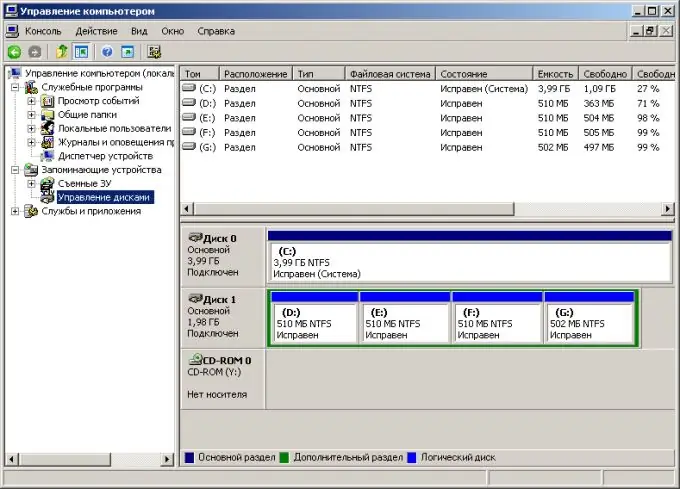
The capacity of hard drives commercially available in today's industry is constantly growing. The amount of data stored by users on their personal computers is growing. The views on the parameters of the capacity of information storage devices that are acceptable for comfortable work are changing accordingly. So, when adding a new drive to a computer, a decision is often made to connect logical drives on the old hard drive to get one, but more capacious information storage location.

Necessary
administrator rights in Windows
Instructions
Step 1
Copy valuable data from the logical drives to be merged. Create temporary folders on the disk that will not be merged. Take advantage of the capabilities of the file manager or explorer. Copy or transfer the data you want to keep from the drives to be merged to temporary folders.
Step 2
Open the Computer Resource Management snap-in. Right click on the "My Computer" icon on your desktop. In the drop-down menu, select "Control".
Step 3
Open the disk management section. If necessary, expand the "Computer Management (local)" branch of the list located on the right side of the application window. Expand the "Storage" branch. Highlight Disk Management. The disk manager interface will be displayed.
Step 4
Remove the logical drives to be merged. In the list of disk drives, find the one that contains the logical drives that you want to connect. Right click on the area corresponding to one of the disks. In the context menu, select "Delete logical drive …". A warning window will appear. Click the "Yes" button. Perform the same operation with all the disks to be combined.
Step 5
Begin the process of creating a new logical drive in the freed space. Right-click on the area labeled "Free". In the context menu, select "Create Logical Disk …" The partition wizard will be displayed.
Step 6
Create a logical drive. In the New Partition Wizard, click Next four times. Select the letter under which the created disk will be displayed. Click Next. Specify formatting options. Click the Next button again and wait for the formatting process to complete. Click Finish.
Step 7
Make sure the disk was created correctly. It should appear in the disk manager. Its condition should be "OK".
Step 8
Transfer the data to the created disk. If necessary, transfer the data saved in temporary folders to a new disk. As before, use the capabilities of the file manager or explorer.


