During the use of discs in CD / DVD drives, they wear out. More precisely, the side of the disc on which the data was recorded is worn out. At the same time, the ability to read information from this disk is lost. How can you extend the life of your favorite disc? The solution to this question lies in the creation of the image. An image is an exact copy of your disk. A disk image has many advantages over the disk itself: the image will never deteriorate or break. Ask why is this happening? Because the image can be stored on your hard drive and you can always burn a new disc from it.

Necessary
Alcohol 120% software
Instructions
Step 1
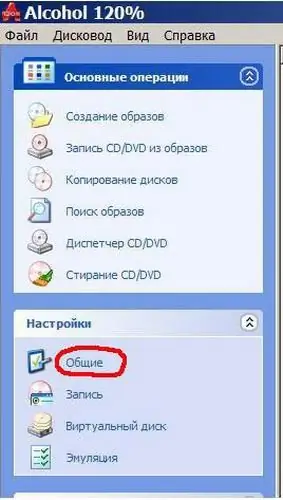
After installing the program, run it. Now you need to fine-tune this program. To do this, on the left pane, select the item in the "Settings" - "General" section.

Step 2
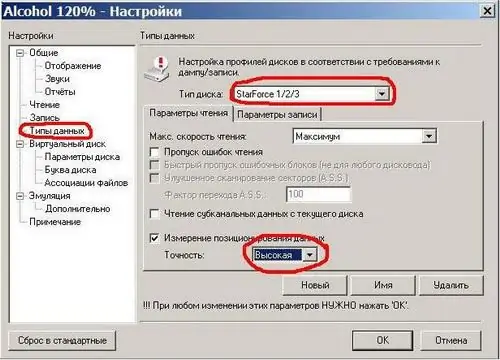
In the window that opens, select the "Data types" section. Here you need to select the type of disk in the appropriate section. Also activate the item "Measurement of positioning data" and set high accuracy. Click the OK button. This completes the global configuration of the program.

Step 3
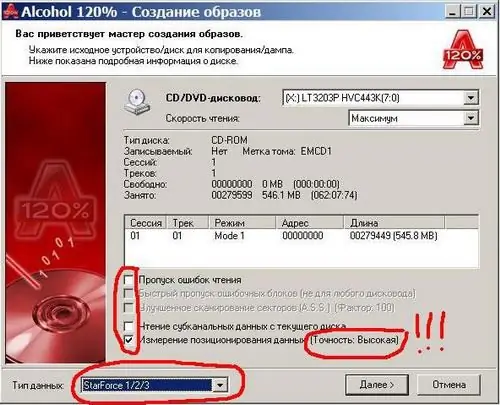
In the main window of the program, select the item "Create images" from the left panel. In the CD / DVD Drive section, specify your CD / DVD drive. In the CD / DVD-speed section, select the minimum speed. In the Data Type section, select StarForce 1/2/3. If you did everything correctly in the previous step, then you should automatically line up the settings, i.e. the item "Data Positioning Measurement - Accuracy: High" will be activated. Click "Next".

Step 4
In the window that appears, select the directory (folder) in which the image of your disk will be stored. It is also worth specifying the measurement speed of the DPM function - set the value to no higher than 4x speed. Click OK and then Finish. Upon completion of the image creation operation, the main window will open, in which you will see the image file of your disk. In fact, there are 2 of these files:
- *. MDF - your disk image (large);
- *. MDS - contains all the necessary information that will be useful when recording or emulating an image.


