You can create and print brochures or even books using a word processor and printer. Microsoft Office Word 2007 is quite suitable for this - it can be used to create brochures of a rather complex structure from scratch, or to print ready-made documents in this format.

Necessary
Microsoft Word 2007 text editor
Instructions
Step 1
Start a text editor and load the document that you want to print in brochure format. This can be done both from the main editor menu, which is opened by clicking on the large round Office button, or by using hot keys. The corresponding item in the menu is called "Open", and the hotkeys assigned to it are CTRL + O.
Step 2
Go to the "Page Layout" tab in the editor menu and in the "Page Setup" command group open the drop-down list labeled "Fields". Select the lowest item in it - "Custom Fields". This will open the Page Setup window.
Step 3
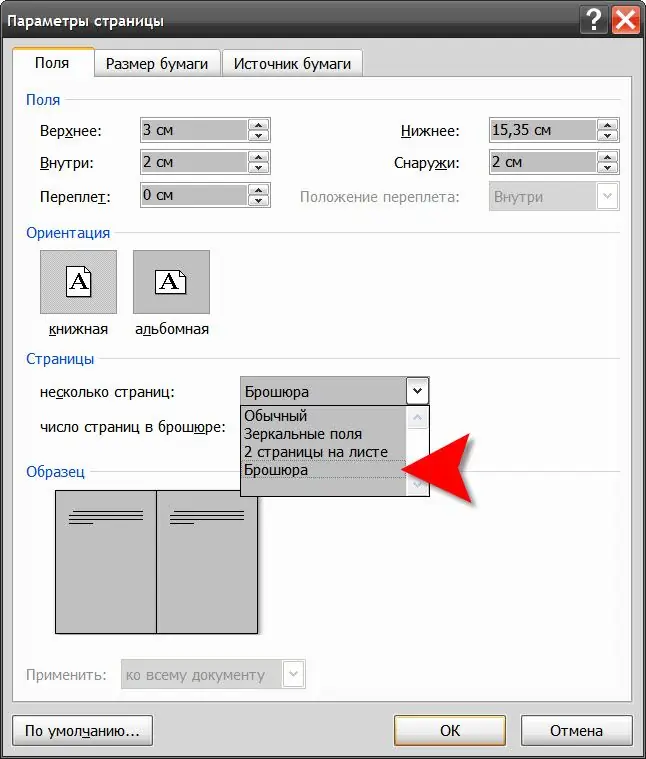
Find the dropdown next to "multiple pages" - it's placed in the "Pages" section of the default "Fields" tab. In the list, select the line "Brochure". When you have done this, another drop-down list will appear in this section next to the word “number of pages in the brochure”. Here you can specify a page limit or leave the default value ("All").
Step 4
Set the values for offsets from the edges of the sheet and the distance between pages on one sheet in the corresponding input fields in the upper section on the same tab.
Step 5
Click the Paper Size tab if you will be using a paper size other than the default A4 size for printing. In the upper section on this tab, you can select the desired format from the list of standards or specify your own, indicating its dimensions in centimeters.
Step 6
Click on the "Paper Source" tab and in the "Distinguish Headers and Footers" section, select the appropriate checkboxes. If your document has page numbering or headers and footers, then in order for them to be printed always at the outer edge (or inner), you need to check the "even and odd pages" box. For even-numbered pages, the brochure will print on the right edge, and on odd-numbered pages, the left edge.
Step 7
Click the "OK" button when all required settings have been changed.
Step 8
If you are going to create a brochure from scratch, then perhaps one of the ready-made markup templates that can be downloaded from the public store directly into Word will suit you. To do this, open the main menu, select the "Create" item in it and click the "Brochures" item in the left column of the dialog that opens. You will be able to select one of the appropriate options for the picture and description, and then open it for editing by clicking the "Download" button.
Step 9
Press CTRL + P to send the brochure to print when you have finished editing and styling it.


