Typically, text files containing SQL statements are used to move MySQL databases from one server to another. To load a not very small amount of data into office applications, intermediate text files are also used. The export operation is easily handled by phpMyAdmin, an application designed to administer MySQL databases directly through the browser.

Instructions
Step 1
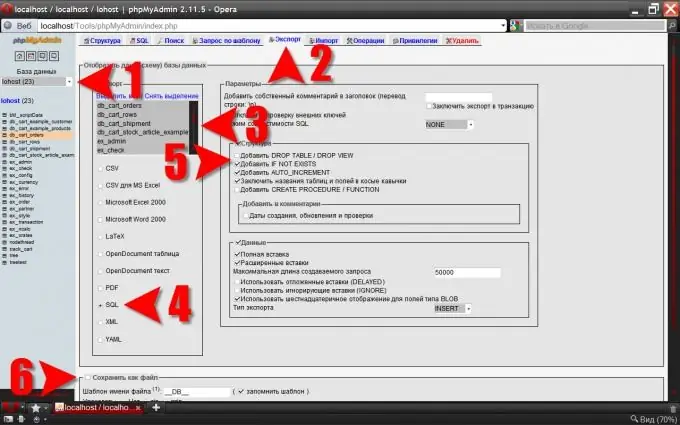
If the database is hosted on a web server, then at the first step of the export operation you need to find the "Databases" section in the hosting provider's control panel, and in it a link to phpMyAdmin. Run the application and navigate to the database containing the tables to be exported. The choice of the required base is carried out in the left pane of the application interface.
Step 2
At the top of the right pane, on the page of the desired database, there are links to various operations - click the link that says "Export".
Step 3
On the export page, the settings are grouped into several blocks. In the block with the title "Export" select all the tables you need - you can click the "Select all" link or mark only a part of the tables by clicking each table of interest and holding down the CTRL key.
Step 4
In the same block of settings, specify the format for saving the exported data. For the subsequent loading of the database to another SQL server, nothing needs to be changed - by default, the SQL format is selected here. And to load data into any office application, you need to select the appropriate format.
Step 5
If the "SQL" format is selected, the page will contain a group of settings with the "Parameters" heading. It is necessary to place the necessary checkboxes in it. Particular attention should be paid here to the settings in the "Structure" section. The check mark placed opposite the inscription "Add DROP TABLE" will lead to the destruction of the existing tables with the same names in the new storage location during the subsequent loading of the database. If you want not to overwrite, but add the exported data to the existing ones, uncheck this checkbox. The "Add IF NOT EXISTS" option has a similar purpose - when uploaded to a new server, the database tables will be created only if such tables do not exist yet, otherwise the data will be added to the existing ones.
Step 6
The exported data will be displayed in the text box by default. You can copy them there, and then, at your discretion, paste them into a text editor or other office application. If you need to save the data to a file, and not display it, then put a check mark next to the "Save as file".
Step 7
The final step in starting the database export procedure is to click on the "OK" button at the bottom of the right pane of phpMyAdmin.


